

Wednesday, June 29, 2011
Garden June 29th
So, it's been just about 1 month since I last took pictures of the garden. Well, posted some, anyway. I've been busy watering almost daily and stalking all my plants looking for vegetables. I'm happy to report that things are going really well.


Wednesday, June 22, 2011
Marinated Flank Steak with Mexican Corn Salad and Mashed Potatoes

Tonight I made something new. I really need to start doing it more since i keep clipping new recipes out. My new recipe pile is huge! Perhaps its time for another month long new recipe extravaganza. I did this a few years back and I got a bit wiped out. It would probably be a good blogging adventure. The downside is that new recipes are often not good on the budget because I buy ingredients I don't typically have or buy. Also, I end up with recipes having out in left field ingredients I'll never use for anything else (chinese five spice, BLECH!). Well, now I've gone off on a tangent. Back to the matter at hand!
I received the recipe in the mail a couple weeks ago from Kroger along with some coupons. I am always excited to find new grilling recipes. This stuff was really good. I love finding new marinades. A few bites into the meal Papa B realized that the corn salad on top of the steak made both even tastier and so we spent the rest of the meal trying to get both things on the fork at the same time. Definitely something we'll make a again.
Marinated Flank Steak
1/2 cup vegetable oil
1/4 cup soy sauce
3 Tbsp Honey
2 Tbsp vinegar
1 tsp garlic powder
1 tsp fresh ginger, grated (I used 1 tbsp ground ginger)
1 cup green onions, chopped (I used 1 tbsp onion powder)
2-2.5 lb flank steak
Mix all the ingredients together and put in a bag with the steak for 12 hours. Drain and discard marinade. Preheat the grill. Grill on medium heat for 5 minutes on each side or until 145 degrees (medium rare).
Mexican Corn Salad
1 can whole corn
1/4 cup red pepper, diced
1/4 cup green pepper, diced
1/2 cup tomato, diced
1/4 cup Red onion, diced
2 Tbsp Olive Oil
1 tsp lime juice
1 Tbsp Cilantro
1/4 tsp ground cumin
1/4 tsp each salt and pepper
Combine all ingredients. Refrigerate any leftovers.
Sunday, June 19, 2011
Upcoming Tutorial Teaser

Here are the supplies I used to make something last week. I'm too tired tonight to type out the tutorial tonight. My Mom is visiting and we spent the evening outside doing yard work. Who knew an acre of land was a lot of work?
Thursday, June 16, 2011
Patching a sheet (and almost anything else!)
Papa B asked me to patch our sheet and so I figured I'd make it into a tutorial since I was doing something crafty anyway. We won't discuss how the sheet got the hole (as someone might find it embarrassing) only how we are repairing the problem. It's a pretty easy fix and you can use this technique to patch lots of other things, including clothes!
What you'll need:


What you'll need:
- Item needing repaired
- Heat n' bond (I used lightweight sold by the yard)
- Iron
- Matching fabric for the patch


Here the hole in my sheet. Still not saying how it got there ;)

First, cut out a piece of my Heat n' Bond. My piece was 12x18 to cover the hole well and provide coverage for the area.

Iron the patching fabric

Put the piece of heat n' bond on the fabric and iron until its stuck on nice and good

Cut the fabric around the heat n' bond

Peel back the paper

lay out your sheet (or whatever) and iron it to get it warm and wrinkle free

Lay your patch down over your hole and iron it down

Here is the ironed on patch from the top

Here's the patch from underneath

Next, zig zag stich around the top of the patch along the edge keeping the edge of the patch right in the middle of your foot.

Here is the patched sheet on the bed. Ok, now who's gonna help me make it??

I couldn't resist taking a picture of Brown Dog enjoying the breeze while I made the bed. He did not help me, btw.

There! Bed is all made with the newly patched sheet! Brown dog jumped on it as I was leaving the room.
Tuesday, June 14, 2011
Strawberry Bread
So, today I made strawberry bread for the first time. It went really well and the bread is delicious. I wanted to make strawberry preserves, but found out that I don't have the right size jars. I hope to buy the right size jars and then get more strawberries so I can make some.
I got this recipe from a friend who found it on allrecipes. AllRecipes really is one of my favorite sites. It is absolutely the first site I go to whenever I'm looking for a recipe. The downside is the comments. The comments are full of suggestions on how to make the recipe better and sometimes its hard to decide which ones to take and which ones not to. I don't know if the strawberry doubling is in the comments, but it's what my friend suggested I do. So, here is the recipe as I made it:
Strawberry Bread
Ingredients:
4 cups fresh strawberries
3 1/8 cups all-purpose flour
2 cups white sugar
1 tablespoon ground cinnamon
1 teaspoon salt
1 teaspoon baking soda
1 1/4 cups vegetable oil
4 eggs, beaten

Preheat the oven to 350. Then butter and flour 2 9x5 baking pans. (I think next time I will try wiping oil on them instead as I can taste the butter on the outside of the bread and don't like it)

Then wash and hull your strawberries

Take half of the strawberries and slice them


In a large bowl, mix flour, sugar, bakin soda, salt and cinnamon


In a separate bowl, mix together the oil, eggs and berries

Pour the strawberry mixture into the flour mixture and mix until blended. Pour into the baking pans
Bake at 350 for 45- 50 minutes until toothpick in center comes out clean.
Let cool for 10 minutes in the pans then turn loaves out and cool.

I've already wrapped one loaf in a layer of plastic wrap, then a layer of foil and put in the freezer for later. Best to do that before the first one is gone or it doesn't make it there.

Did I mention the best part of having a bunch of strawberries around is strawberry math? What does happen if you have 5 strawberries and I eat 2?
Monday, June 13, 2011
Strawberry Picking

Today we went strawberry picking with a friend of mine. We do lots of things with them and its great because her daughters are just a few months apart from mine. As you can see Peanut and Munchkin had a good time playing with their friends and picking strawberries.
Stay tuned for tomorrow I am going to attempt to make strawberry preserves for the first time!
Tuesday, June 7, 2011
Chinese Wedding Reception
So, I got to experience my very first ever Chinese wedding reception. Boy, it was cool. It was more likely than not a once in a lifetime event for me. There were a ton of traditions during and leading up to the wedding and ceremony. Some of them involved pastries, and some involved hair brushes. I don't know the details of the pastry one but I do know a bit about the hair brush. According to tradition, the bride has to have her hair brushed by a "lucky woman" the day before her wedding. The lucky woman (from what I understand) must have 3 generations of her family alive, must be fertile (has children) and must have no divorce in her family. It really is a hard person to find.
Another Chinese wedding tradition is the tea ceremony. You can read here more about the tradition . My Sister and her husband chose to do the ceremony at the reception and involved all of the parents.

One of the more strange, but also more fascinating traditions was the way they serve food. It brings good luck to serve food whole. So, we were served a whole chicken and a whole fish. I was told that the restaurant removed the chicken heads from some of the plates so as to not freak people out. My sister was kind enough to bring one over for us to see. I wont ever get THAT image out of my head.


On the top is the chicken. It is a whole chicken that was sliced, bones and all. On the bottom is a fish (I don't know what kind) cut apart. My Mom said that it was filleted but served on top of the bones. I'm not a fish eater and so I don't know for sure.
The more "American" parts of the wedding was the dancing. Munchkin started walking full time just 2 days before the wedding and so she really enjoyed running around on the dance floor. Here she is showing off the eyelet lace dress I made her.


So, if you ever get invited to a Chinese wedding reception do everything you can to attend. It's something really special. Congrats to the new couple!!
Another Chinese wedding tradition is the tea ceremony. You can read here more about the tradition . My Sister and her husband chose to do the ceremony at the reception and involved all of the parents.

One of the more strange, but also more fascinating traditions was the way they serve food. It brings good luck to serve food whole. So, we were served a whole chicken and a whole fish. I was told that the restaurant removed the chicken heads from some of the plates so as to not freak people out. My sister was kind enough to bring one over for us to see. I wont ever get THAT image out of my head.


On the top is the chicken. It is a whole chicken that was sliced, bones and all. On the bottom is a fish (I don't know what kind) cut apart. My Mom said that it was filleted but served on top of the bones. I'm not a fish eater and so I don't know for sure.
The more "American" parts of the wedding was the dancing. Munchkin started walking full time just 2 days before the wedding and so she really enjoyed running around on the dance floor. Here she is showing off the eyelet lace dress I made her.


Here's Peanut dancing with another 3 year old at the wedding. They met at the shower and hit it off so it was great to see them together again. Sorry it's not the best picture, but the good ones showed their faces really well.

So, if you ever get invited to a Chinese wedding reception do everything you can to attend. It's something really special. Congrats to the new couple!!
Monday, June 6, 2011
Busy busy!
We're back! I was just in Boston for my Sister's wedding and didn't open my laptop at all while I was gone. I'll be posting pictures from the wedding and then pictures of her wedding gift and a tutorial. So much to do! Also, the garden has grown a bunch and I can't wait to show you new pictures of that! So, get crafting!!
Monday, May 30, 2011
Garden on Memorial Day

I've been using my garden as an excuse for not blogging a bunch lately and so I thought I would share it with you. Also, its kind of fun to chronicle how it grows over the summer. The top picture is of the full garden, fence and all. In it are sugar snap peas, broccoli, green beans, lima beans, carrots, yellow onions, red onions, cabbage, cherry tomates, beets, roma tomatoes, beefsteak tomatoes, red peppers, green peppers, jalapenos, banana peppers, pickling cucumbers, salad cucumbers, pumpkins, and zucchini. Phew! Did you catch all that?
The middle row on the left are 2 cucumber seedlings. The middle top are green bean seedlings with a picture of some of the cabbage and beets below. Then on the right is a pepper plant growing my first pepper of the season!
The bottom row is a picture of my grapes (already here) and then on the right is one of my 2 marble pots. This pot has all my herbs in it. There is basil, thai basil, 2 kinds of rosemary, flat parsley, curly parsley, cilantro, spearmint, thyme, chives, sage and dill. The other pot (not shown) is full of lettuce. I also have a couple small pots that contain more cucumbers, peppers (green and serrano) and my potato bucket.
All of my seeds started sprouting the last 2 days. It is very satisfying to put a seed in the ground and then watch it sprout into a big plant. I can't wait to pick some veggies and eat them! I also hope that by including Peanut in all of this that she'll be more willing to eat the veggies versus when we buy them from the store. So far she's just excited about the pumpkins.
Stay tuned for more garden updates!
Sunday, May 29, 2011
Lavender Sugar Scrub

This is the last gift I made for my Sister in Law's baby shower. It's a lavender sugar scrub by Maybe Matilda. I thought it was important to include something for her. Anyone who's been pregnant knows how draining and uncomfortable it can get at the end. I thought this could help her feel better, even if just for the length of a shower or two. I ended up having some extra and so I used it in the shower. It was really nice and made my skin feel really soft. I hope to do some more homemade beauty products in the future.
P.S. - I'm sorry I haven't been posting much recently. I'm feverishly working on my Sister's wedding gift and have spent a ton of time getting my gardens set up. I finally have everything planted. Yay!
Friday, May 27, 2011
Onesie Dress

Yet another thing I made for my Sister In Law's baby. I just love how it turned out. I used this tutorial from Love To Create. It was super easy and I love how it looks.

First I folded my onesie in half and drew a line across.

I measured around the body of the onesie and added 1 inch for seam allowance. Then I cut a strip 2 1/2 inches by that measurement. I sewed it into a tube and pressed open the seam. I then pressed it with the seam in the middle before turning it. After I turned it right side out I repressed it with the seam in the middle.

I cut my main piece to be 42" long and 9" wide. I made a bottom hem then did a gathering stitch along the top. I pined it to my "belt" piece and sewed it around. I then carefully pinned it around my onesie and sewed along the top.

Here is my final product. I was concerned about the purple fabric at first but I really liked it once I saw it all finished. Sorry I didn't take more pics of the process. Sometimes its hard to remember to stop and take a picture before moving on.
Monday, May 23, 2011
Bucket Potatoes: Day 1
Spring has finally sprung here in South East Michigan. We have finally passed the danger of frost and so for the past week or so I've been working in the garden every day. I've planted tomatoes, pepper, peas, squash, cucumbers, pumpkins, beans, cabbage, lettuce, carrots, and broccoli. Today I put in the herbs (12 kinds!) and started the potatoes. I'm pretty much a novice when it comes to gardening, but I've heard that potatoes are easy. After doing some research I decided the best method that worked for me was growing them in a bucket. This is how I set it up. Check back later for updates on whether or not it works.

I used a bag of potting mix (8.99), 2 yukon gold potato seeders (.39 each) and a 7 gallon bucket from the hardware store (4.99).

First I put a couple inches of potting soil in the bottom of my bucket.

Then I put my potato seeders with the chits facing up in the bottom. If you don't know about chitting (I didn't) I suggest you google it like I did. It's easy!

Next I put just enough potting mix in to cover them up. Then I watered a whole bunch. Now I wait to see little potato plants popping through!
Sunday, May 22, 2011
Running Stitch Blanket by Purl Bee

Another gift for my Sister In Law is the running stitch blanket by the Purl Bee. I really love the idea because its an easy blanket, but the running stitch adds a personalization to it. I also considered embroidering the baby's name on the solid side, but decided against it. I know they have decided on a name but what if she comes out a boy? Or what if they look at her and decide she looks like a "something else?" I just figured it was better not to take any chances. I know the Purl Bee did hers in all cotton, but I like the one side of fleece and one side of cotton. It makes it a little thicker, but not too thick. Since you can't really see the running stitch very well in this picture here's another one where you can see it better.

I had bought a specific green to match the green in the blanket, but could not find it for the life of me. Of course the day after I finished the blanket I found it. I'm not sure if that's how your life goes, but it sure is how mine does. Maybe it's something that gets better with age, though I doubt it. I'm still plugging away at my sister's wedding gift. Only 2 weeks left to finish it!
Thursday, May 19, 2011
Turtle crinkle taggie blanket w/ Tutorial

This is a taggie turtle I maid for my sister in law's new baby. I was inspired by this turtle, though it turned out very different from it. It crinkles, since that seems to be the "in" thing among babies these days. His top is fleece and the underside is cotton (of the pillow sham variety). The "tags" are pieces of ribbon. The crinkle is made of a piece of a Tostitos bag. I felt it was appropriate since I made him on Cinco De Mayo. I had to wait to give the gifts to my sister in law before I could share them. This is one of 4 things I made for her baby shower.
So, let me show you how I did it!

What you'll need:
Scrap of fleece
Scrap of Cotton
12" of Ribbon
Empty chip bag or something equally as "crinkly"

Cut the ribbon into 4 4" long pieces. Cut an oval out of the cotton, fleece, and bag for the body. I drew my oval and cut it out on paper first and used it as a template. Cut 2 head pieces out of fleece.

Put the 2 fleece head pieces together and sew around the edges, leaving the bottom straight edge open. Trim and turn right side out.

Lay the fleece oval down first. lay the head on the fleece where you want it facing inward. Then, fold the ribbon pieces in half and place them where you want them matching the raw edges of the ribbon with the edge of the oval. Put the cotton on top and then the plastic bag on the very top. Pin all the layers together. Make sure you put pins where the ribbon and head pieces are so that they don't move.

Should look like this. All of the pieces of ribbon and the head should be sandwiched in between the fleece and cotton layers facing inward. Next you're going to want to sew around the circle through all the layers. Make sure to leave a hole open along the bottom for turning. I marked my starting and stopping point with the Green ball tipped pins. If I don't mark them I tend to sew the hole way and then have to rip some of it out.

Next, turn the turtle right side out. I top stitched around the edge to close up the hole and to make it look more shell like. Now, if you wanted to you could stop here. He's a functioning turtle toy. The next step just makes him cuter, in my opinion.
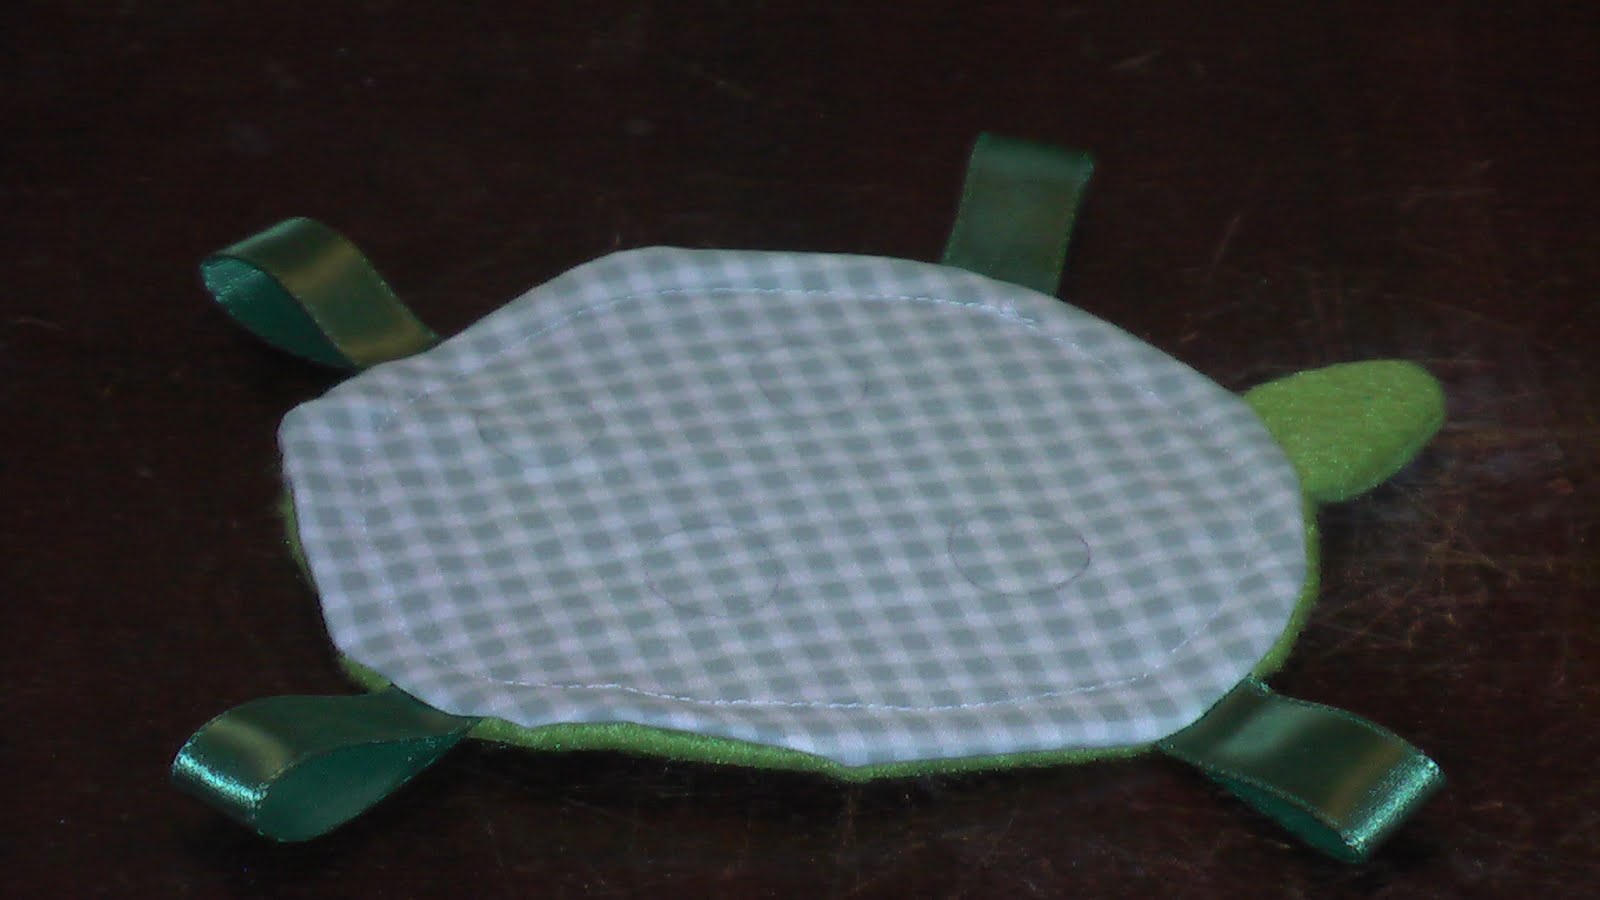
Next, flip him over to his tummy. Draw 4 circles scattered along his belly using a pencil. Then, set the stitch on your machine to the smallest stitch possible. The smaller the stitch, the more it puckers as you sew.

Sew the 4 circles following your pencil drawings. This will give him four bumps along the top of his shell. Trim your threads and your done! Now, if you did use a pencil to draw on him I suggest you wash him before handing him over to your baby. I don't think it would harm them, but I also don't want any sick babies!

He really liked basking in the sun next to our pond with his own kind. He felt very much at home there. Too bad he got shipped off to New Jersey.
Subscribe to:
Posts (Atom)