Tuesday, April 26, 2011

Chicken Fricasee (shortcut version)


Chicken Fricassee is one of Papa B's favorite childhood meals.  He tells me its a secret family recipe, but I don't see any secret ingredients.  I love to make it on cold winter days.  However, when you're trying to use up leftovers and want to use what's on hand, it works any time of year.   Normally I boil the chicken and veggies together, but today I did the shortcut version with the leftover chicken from the Maple Glazed Roast Chicken.

Chicken Fricasee
3 cups roasted chicken cut into pieces
3 stalks celery
1 1/2 cups baby carrots
1 yellow onion
2 cups white rice
32 oz chicken broth
2 tbsp parsley
salt & pepper to taste

Cut up the chicken and veggies into bite size pieces.  Put into a big pot along with the broth, parsley, salt and pepper.  Bring to a boil, lower heat and simmer.  Once you get everything into the pot start the rice.  I make my rice by putting 2 cups rice in a pot with 4 cups water; bring to a boil.  Lower heat to low, cover, and simmer for 25 minutes or until rice is cooked.  By the time your rice is done all your veggies should be nice and soft.  Spoon some rice onto a plate and ladle some of the chicken mixture on top.

Like I said before, I could still taste the cinnamon from the chicken.  It made it taste a little different, but didn't take away from the new flavors of the veggies and parsley.  If you are concerned just use leftovers from a more traditionally roasted chicken.

Monday, April 25, 2011

Maple Glazed Roast Chicken


Anglophile: A person who greatly admires or favors England and things English.

I think today Papa B and I took our Anglophilia to a whole new level.  I found a recipe for Maple Glazed Roast Chicken on a British website.  I even had to change the oven temperature from Celsius to Fahrenheit.    Heck if I remember the formula from Chem 101.  Thank goodness for Google Calculator.

So, without further ado, here's the recipe Ol' Chap!

Maple Glazed Roast Chicken
1 whole chicken
5 tbsp red wine vinegar, divided
4 tbsp maple syrup
1 tsp ground cinnamon

1) Preheat the oven to 400°. Season the chicken and pour 2 tablespoons vinegar into the body cavity. Put in a roasting pan and roast for 1 hour 10 minutes.
2) Meanwhile, mix together the remaining vinegar with the syrup and cinnamon. Brush half the mixture over the chicken and roast for a further 10 minutes. Brush with the remaining glaze and return to the oven for a final 10 minutes, until the chicken is deeply golden and shiny. Rest for 5 minutes before carving.


We really liked it.  Papa B wanted a different type of roasted chicken from the normal and this definitely fit the bill.   The cinnamon flavor really stands out and is new to my taste buds in combination with chicken.  I used the leftovers in a different recipe (stay tuned!) and I could still taste the cinnamon.   It's definitely a recipe we'll hold onto.  It doesn't hurt that its English.

Sunday, April 24, 2011

Foam Eggs


I cut these out before the demise of my Cricut Expression.  I cut out the foam eggs and the squiggly lines.  Then I used a container of sticky back foam flowers I already had.   Peanut really enjoyed decorating her eggs.  Anything that involves a glue stick and stickers is great fun in her book.  Sticky back magnetic strips on the back finished them off!  She's been enjoying playing with them on the fridge for the last couple weeks.  

Happy Easter!

Thursday, April 21, 2011

Carly the Caterpillar Day 11


I had just about given up on Carly when I went in the playroom today to check on her one last time.  To my great surprise, there were sprouts!  A few more popped up by the time I went in there again 4 hours later.  I can't wait to see how she looks when we get back from PA!

Wednesday, April 20, 2011

More Baby food


I just love the colors of the homemade baby food.  From left to Right: Carrots, sweet potatoes, squash, apples below the squash, and pears on the end.  It's all organic foods and prepared in my kitchen.  Makes me feel good about what I'm feeding my kid.  She seems to feel good about it too.  Ate 4 cubes tonight at dinner, a new record.

Sunday, April 17, 2011

Mooshy Bunny (and another basket)


Like many parents out there, I believe my kids' easter baskets need a bunny in them.  Being a crafty Mama, I like making the bunnies.  That's where the Mooshy Belly Bunny comes in.  I've had this bunny saved for a while now and I thought it would be the perfect bunny for the baskets this year.  My friend had already tried it and warned me that they are much smaller than it appeared on the site.  I had planned on making one for each of my girls, but now I'm not so sure.  Mostly, I just wasn't very happy with the pattern.  I found sewing it to be frustrating (probably the knit's fault) but also, I think his arms are kind of skinny and long.  I thought adding the ears afterwards by hand sewing them on was kind of time consuming and I'm concerned about their longevity.  Go ahead and try the pattern, maybe it'll work better for you.  I still think the little bunny turned out cute and I'm sure Munchkin will love it.


Here's the bunny in Munchkin's easter basket, also made today.  

Friday, April 15, 2011

The Wrap Around Blouse


I have to admit, I'm totally in love with this shirt.  I wish I could wear it every day.  It all started a few weeks ago when I saw an article in the Sunday paper on the new trends for Spring.  In it was this beautiful shirt from Anthropologie:


Adorable, right?  Well, if you didn't click on the link I will tell you a few things about it.  First, it's $98.  Second, it's made out of silk and dry clean only.  Bummer!   I don't know about you, but I'm a stay at home mom on a tight budget.  Not only is a $98 shirt out of the question, but silk?!?  I would break down crying the first day I wore it when it was covered in either ketchup or bodily fluid of some kind (both equally as likely).

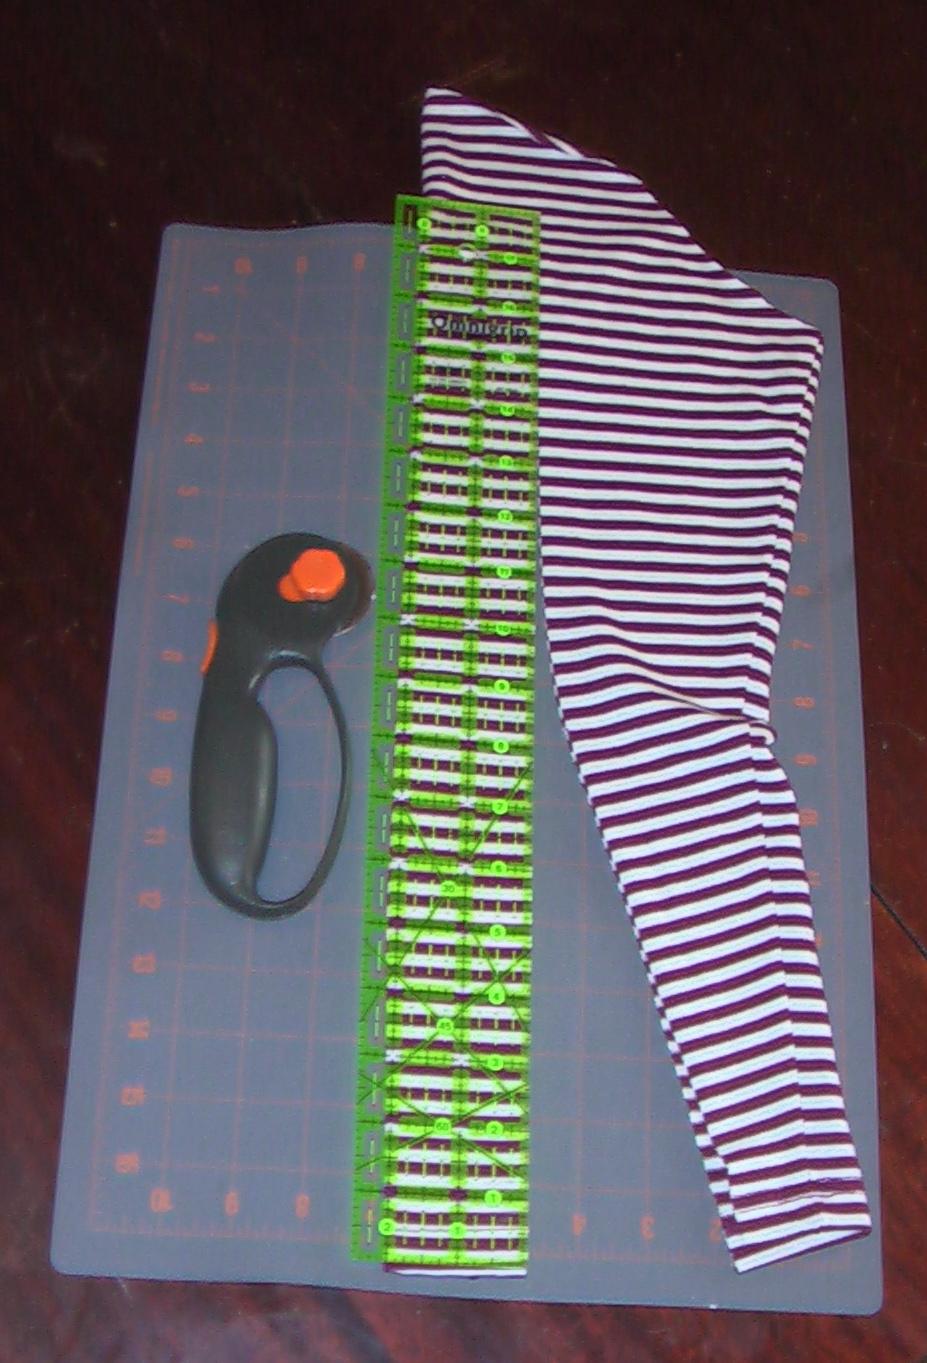
So, I set out to make this shirt out of jersey knit.  And, who wants to make a whole shirt?  I don't have time for that.  So, I did the next best thing.  Headed to the thrift store!  Pocket and environmentally friendly!  I had something specific in mind, a long sleeve, stripped t-shirt with a high collar.  I was really hoping for the same type of navy and white stripe, but you can't always get exactly what you want at a thrift store.  So, voila!  This is what I found.


Beautiful!  And totally worth $1.99!  Seriously, wouldn't be caught dead in public in this shirt.  Fortunately, I had a plan for it.

1) cut the sleeves off your shirt leaving 1 inch beyond the sleeve seam.  This inch is for your hem.

2) Fold down the extra inch in half.  Fold again and pin.  This is to finish the hem in the arm holes.


3) Hem the arm holes.  I used 1/4 inch seam going around.  I also started in the arm pit just to hide the doubling back.

4) Next we have to gather the front and back of the shirt.  I like to put pins in perpendicular to the seam to mark where I need to start and stop when I only need to sew some of it.  I put my pins about 4" down from the top center in the front and about 2" in the back.  Using a gathering stitch, sew across the front from one pin to the other.  Repeat for the back.


5) Pull one of the strings for the stitch to gather up the front.  It doesn't need to be really gathered, just enough to give a little pucker.  Repeat for the back.


6) Next, lay out the sleeves.  Cut them down the middle up against the seam.  Then cut one sleeve into 2 pieces, each 4" wide.  Cut the other one into 1 piece 4" wide.  So, you should have 3 pieces each 4" wide.  Cut the top where the sleeve curves straight so they are rectangular.


7) Lay the 3 pieces length wise next to each other and pin the right sides together on the short ends.  Line up the stripes (if you have them).  Sew the pieces together so now you have one really long piece.


8) Fold the two outer sections in half inside out.  These will be the ties that hang down.  Make sure to line up your stripes!  Pin them up to the seam at the middle section.  Once you have them pinned, cut the far ends at an angle.

9) Sew from the seam with the middle section to the end on both sides.  Clip the very top of the tip.  Turn them right side out.  You should now have the long strip with both ends finished and right side out and the middle section still open with the raw edges.

10) Fold the middle section in half.  Put up to the collar of the shirt lining the raw edge up against the top of the shirt collar.  Line up the beginning of the raw edge about 1 " down  from top center on the right side.  Pin the new collar piece to the old collar stopping at the top center.  This should take up the entirety of the raw middle section of the collar/ties.  Sew a 5/8" seam all around.


11) Take a deep breath and try it on!  


Thursday, April 14, 2011

A little bit of green on a day full of chores


Today was spent doing chores around the house.  One of those chores was making baby food.  I know some people's toes curl at this picture (my mother in law is one of them), but I was amazed at the brightness of this green.  Who knew peas could be so pretty?

Wednesday, April 13, 2011

Steak Kabobs


So, I forgot to take a picture before we started chowing down.  My apologies.  These were made up as I went along.  I decided this morning to marinate the steak in preparation for dinner.  So, this is what I did.

Ingredients:
1 lb steak cubes
1 yellow onion
1 zucchini
1 green pepper
handful cherry tomatoes
1/4 cup Worcestershire sauce
1/2 cup olive oil (divided)
3 cloves garlic, minced
1/2 tsp salt
1/4 tsp pepper

Directions:
First, cut the steak if you bought a whole one.  Place steak in a bag along with 1/4 cup olive oil ,the Worcestershire sauce, garlic, salt and pepper.  Let marinate a minimum of 8 hours up to overnight.

Chop up the onion and pepper into big chunks.  Slice the zucchini into thick pieces.  Drain the marinade from the steak.  Push pieces of pepper, steak, onion, zucchini, and tomatoes onto skewers.  Drizzle some olive oil on the vegetables and sprinkle with salt and papper.  Grill the kabobs on medium heat until the veggies are cooked.  I prefer my steak rarer, so my concern are the vegetables.

Monday, April 11, 2011

Pulled Pork BBQ


This is a recipe that's been in my book for a while.  It's super easy and very yummy.  It's so easy to change it up and make it your own by changing up the sauce and beer you use.  Today I used Kraft's Honey BBQ Sauce (my personal favorite) and Moosehead Lager (what was in the fridge).   Also, we put more BBQ sauce on top of the pork after we put it on the bun.  It doesn't say to do that in the recipe.

Ingredients:
2 pork tenderloins (about 1.5 pounds)
1/4 teaspoon garlic powder
1/2 teaspoon salt
1/4 teaspoon pepper
1 large sweet or yellow onion, chopped
3/4 cup bottled barbecue sauce (your choice)
1/2 cup non-alcoholic amber beer or light beer

Directions:
Coat the inside of the slow cooker with canola cooking spray. Place the pork tenderloins in the bottom of the slow cooker and sprinkle the garlic, salt, and pepper evenly over the top.
Sprinkle chopped onions over the pork and top that with the barbecue sauce and beer. Add the cover and cook on LOW for 8 hours. Shred the pork with a fork and stir to combine all of the ingredients.Serve the pork filling on a whole grain bun or roll.

Unfortunately, since I've had it for a while, I can't tell you what the source is.

Cinnamon Pull apart Bread


I tried this recipe for cinnamon pull apart bread.  A friend brought over cream cheese frosting to put on top.  Without the frosting I found it to be kind of chewy.  It's also possible I overcooked it.  With the frosting it was delicious!  Something yummy for an occasional saturday morning or for a brunch with friends.

Sunday, April 10, 2011

Overalls for Munchkin!


I made these great little overalls for Munchkin to wear this summer.  I used butterick pattern 5625 and it was really easy to make.  The fabric is a sheet I bought at the thrift store for $2.

Friday, April 8, 2011

Flower Easter Basket Tutorial


I really wanted to make my own easter baskets for the girls.  Since felt is so cheap and easy to work with it became the obvious choice.  

Supplies Needed:
 - 1/4 yd felt (multiple colors if you want to)
- Empty cereal box or similar food box (Mine is a graham cracker box)
- Hot Glue
- 1 Pipe cleaner (6 1/2" long)
- Piece of plastic canvas
- Pattern Pieces (when you look at the doc it shows blank, but when you go to print it's fine)


Cut out 1 circle in felt and one out of your box.  Cut 7 petals.  Cut 2 1" wide strips for your straps in felt and 1 1/2" wide piece of plastic canvas.  I cut out a 2nd 1" piece in pink and glued it around the inside of my basket for extra security.  I don't think it's needed.   Using the petal pattern provided, put straight pins in at the marked points on 4 of the 7 petals.


Glue the circle felt to the piece of cardboard. 


Put a line of glue along the bottom of the first petal with pins in it and attach to the side of the circle.  Put a line of glue along a 2nd petal (one with no pins) and put it on the circle overlapping the first petal by 1/4".


After you have your 2nd petal attached, put a line of glue up the side of the pinned petal stopping where the pin is.  Lift the petals up and push them together where its glued.

Repeat the last 2 steps until you are around the whole way.  You'll have to glue both sides of the last petal.


It should look like this.  You can now remove the pins.

Take the first handle piece and run a strip of glue down it.  Attach the plastic canvas to it.  Then glue the other strip on top of the canvas.  (sorry I don't have pictures of this)  Glue the handle to the inside of the basket.

FOR THE BUTTERFLY:


Cut 2 wings out of felt and fold the pipe cleaner in half.  Twist the pipe cleaner together leaving the top  3/4 inch untwisted.  put a line of glue along the tab part of one wing and overlap the wings at their tabs.  Glue your twisted pipe cleaner on top of the center of the wings.  You can then curve the open ends of the pipe cleaner to make the antennae.   Glue the butterfly onto your basket wherever you want it!


Fill it with any easter goodies you want and enjoy!

I'm participating in a Spring Link party at

Photobucket


Wednesday, April 6, 2011

Shadow Puppets


These are the shadow puppets I mentioned in a previous post. My step mom suggested that they'd be perfect in a vase.  I don't have a vase, so this spaghetti sauce jar will do.  I plan on decorating it in a future post.


These are the bugs and flower I made for the "Grasshopper lost his hop" play I made up

This is Goldilocks and the 3 bears the modern version.  I didn't have porridge, beds, or chairs, so I went with ice cream and boots instead.

These are the other ones I made to do random stories with.

I really do think the cricut worked really well.  I had a lot of fun finding shapes to do and it was easy to do 20 (the number of dowel rods I had).

Monday, April 4, 2011

Picket Fence Centerpiece


Other than the cookies turning out not so great, I really love how this turned out.  I love all my little flowers and I think it has a great picket fence look.    

So, here's how I did it:


First I painted the top and insides of my crate.

Then I glued popsicle sticks on the sides.  The long sides are a 1 large 7 small pattern and the short sides are a 1 long 11 small pattern.

Then I painted it all white. It took 2-3 coats.

I used paint pens to paint flowers and grass all around

Here's the other side

I used the wilton's cookie pop pan to make the flowers and a not so great sugar cookie recipe.  I only used that recipe because I didn't have the butter most commonly found in sugar cookie recipes.  I plan on trying the recipe that came with the pan in the near future.