Friday, April 15, 2011

The Wrap Around Blouse


I have to admit, I'm totally in love with this shirt.  I wish I could wear it every day.  It all started a few weeks ago when I saw an article in the Sunday paper on the new trends for Spring.  In it was this beautiful shirt from Anthropologie:
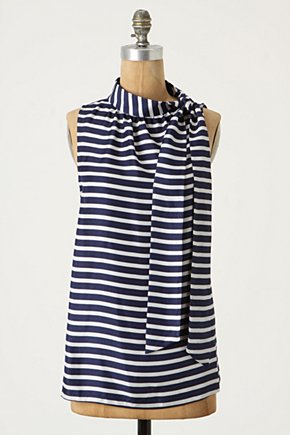

Adorable, right?  Well, if you didn't click on the link I will tell you a few things about it.  First, it's $98.  Second, it's made out of silk and dry clean only.  Bummer!   I don't know about you, but I'm a stay at home mom on a tight budget.  Not only is a $98 shirt out of the question, but silk?!?  I would break down crying the first day I wore it when it was covered in either ketchup or bodily fluid of some kind (both equally as likely).

So, I set out to make this shirt out of jersey knit.  And, who wants to make a whole shirt?  I don't have time for that.  So, I did the next best thing.  Headed to the thrift store!  Pocket and environmentally friendly!  I had something specific in mind, a long sleeve, stripped t-shirt with a high collar.  I was really hoping for the same type of navy and white stripe, but you can't always get exactly what you want at a thrift store.  So, voila!  This is what I found.


Beautiful!  And totally worth $1.99!  Seriously, wouldn't be caught dead in public in this shirt.  Fortunately, I had a plan for it.
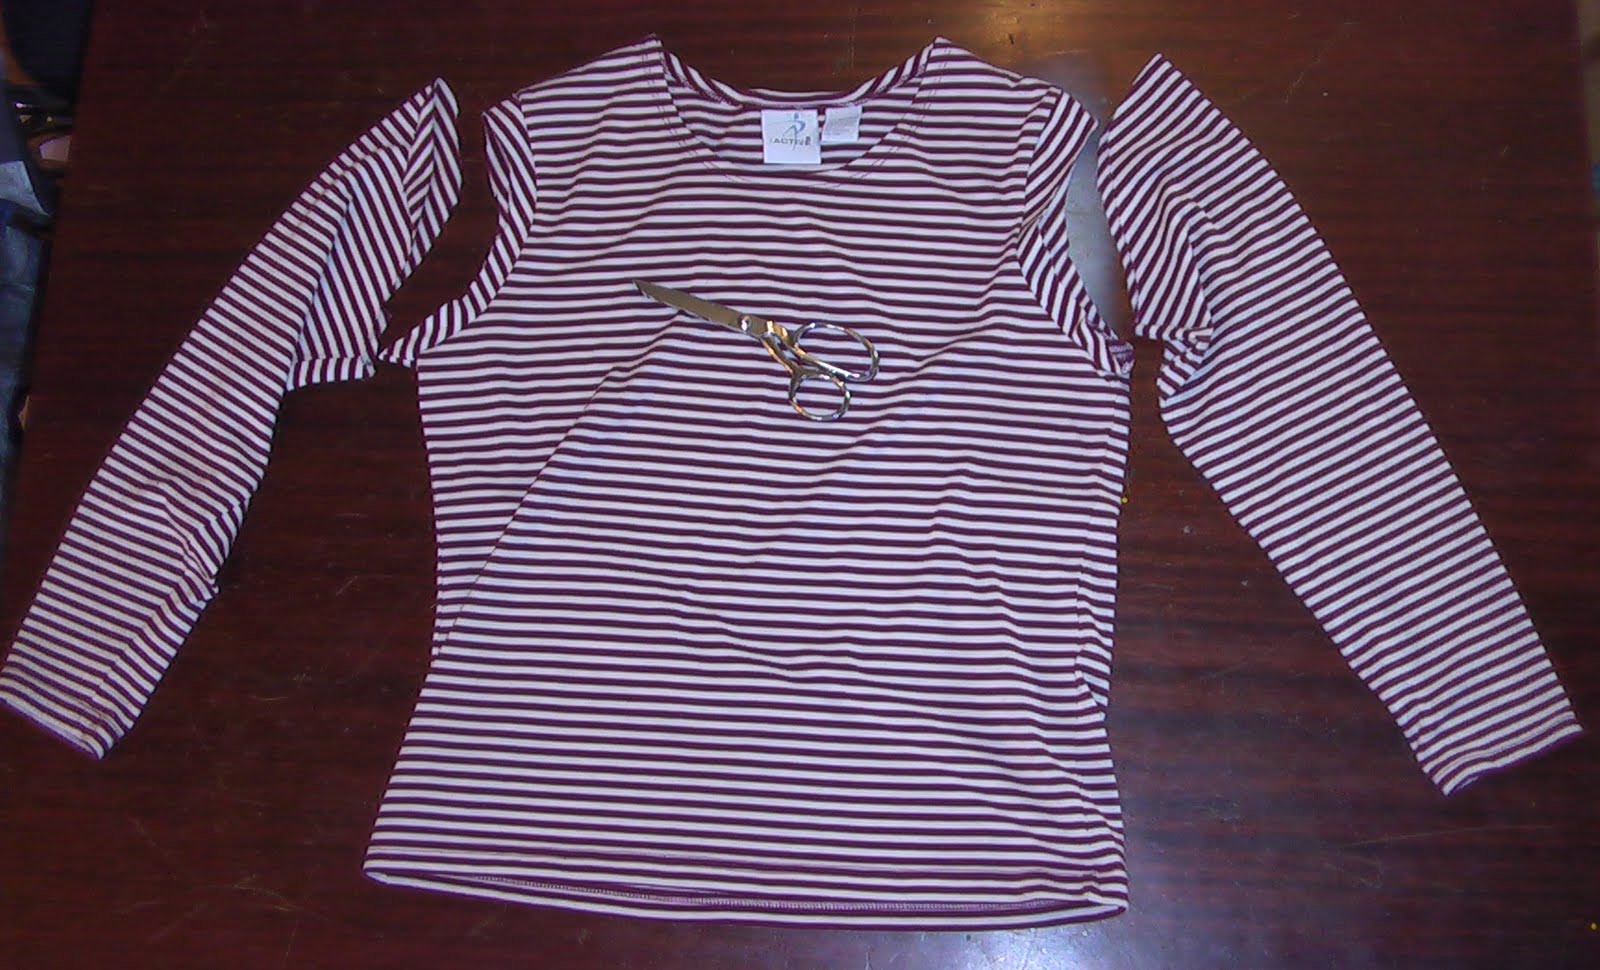
1) cut the sleeves off your shirt leaving 1 inch beyond the sleeve seam.  This inch is for your hem.

2) Fold down the extra inch in half.  Fold again and pin.  This is to finish the hem in the arm holes.


3) Hem the arm holes.  I used 1/4 inch seam going around.  I also started in the arm pit just to hide the doubling back.

4) Next we have to gather the front and back of the shirt.  I like to put pins in perpendicular to the seam to mark where I need to start and stop when I only need to sew some of it.  I put my pins about 4" down from the top center in the front and about 2" in the back.  Using a gathering stitch, sew across the front from one pin to the other.  Repeat for the back.


5) Pull one of the strings for the stitch to gather up the front.  It doesn't need to be really gathered, just enough to give a little pucker.  Repeat for the back.


6) Next, lay out the sleeves.  Cut them down the middle up against the seam.  Then cut one sleeve into 2 pieces, each 4" wide.  Cut the other one into 1 piece 4" wide.  So, you should have 3 pieces each 4" wide.  Cut the top where the sleeve curves straight so they are rectangular.
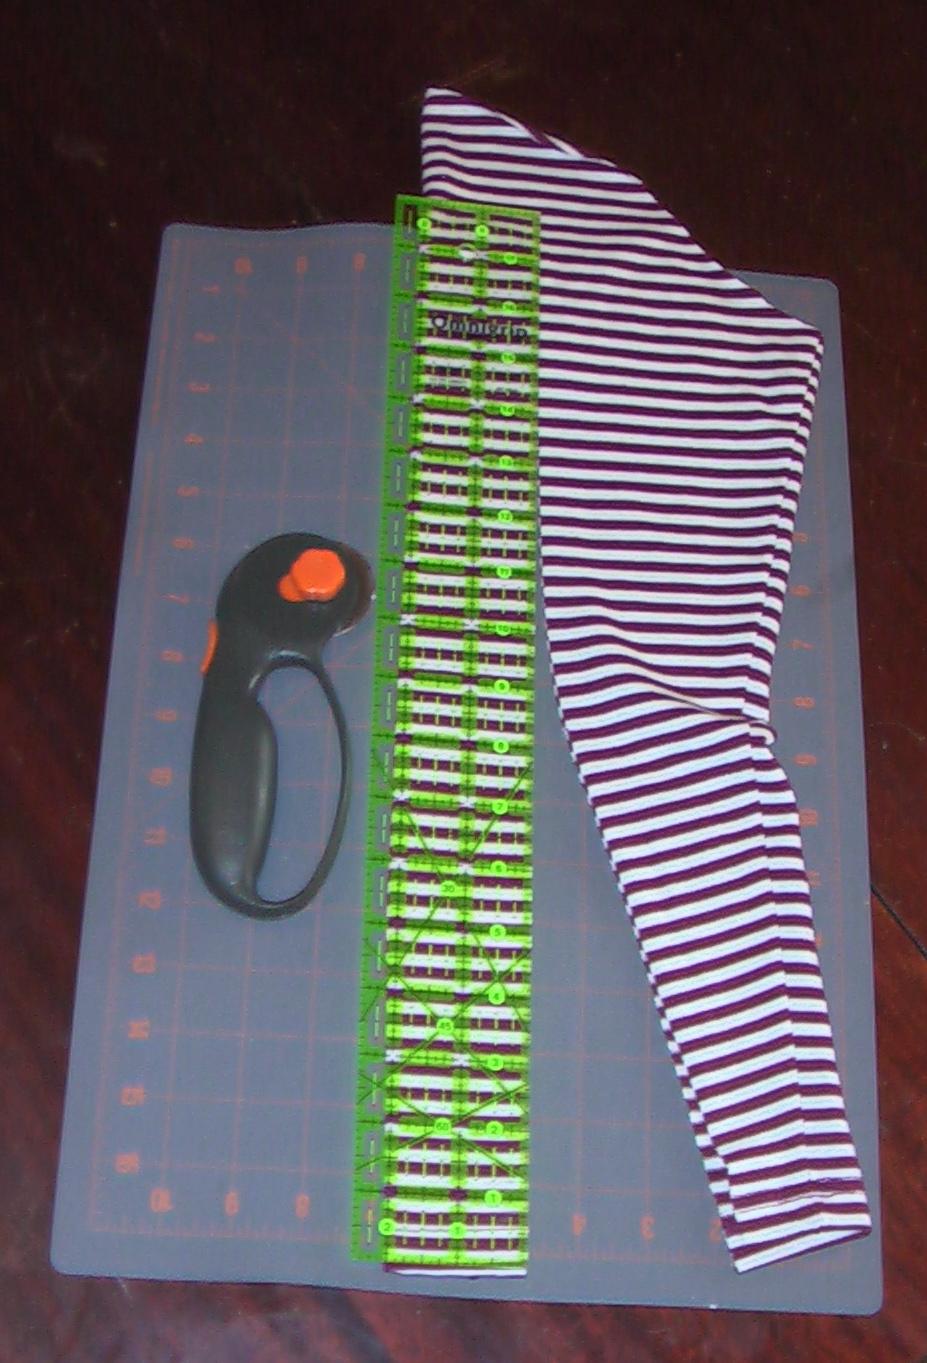

7) Lay the 3 pieces length wise next to each other and pin the right sides together on the short ends.  Line up the stripes (if you have them).  Sew the pieces together so now you have one really long piece.


8) Fold the two outer sections in half inside out.  These will be the ties that hang down.  Make sure to line up your stripes!  Pin them up to the seam at the middle section.  Once you have them pinned, cut the far ends at an angle.

9) Sew from the seam with the middle section to the end on both sides.  Clip the very top of the tip.  Turn them right side out.  You should now have the long strip with both ends finished and right side out and the middle section still open with the raw edges.

10) Fold the middle section in half.  Put up to the collar of the shirt lining the raw edge up against the top of the shirt collar.  Line up the beginning of the raw edge about 1 " down  from top center on the right side.  Pin the new collar piece to the old collar stopping at the top center.  This should take up the entirety of the raw middle section of the collar/ties.  Sew a 5/8" seam all around.


11) Take a deep breath and try it on!  


Thursday, April 14, 2011

A little bit of green on a day full of chores


Today was spent doing chores around the house.  One of those chores was making baby food.  I know some people's toes curl at this picture (my mother in law is one of them), but I was amazed at the brightness of this green.  Who knew peas could be so pretty?

Wednesday, April 13, 2011

Steak Kabobs


So, I forgot to take a picture before we started chowing down.  My apologies.  These were made up as I went along.  I decided this morning to marinate the steak in preparation for dinner.  So, this is what I did.

Ingredients:
1 lb steak cubes
1 yellow onion
1 zucchini
1 green pepper
handful cherry tomatoes
1/4 cup Worcestershire sauce
1/2 cup olive oil (divided)
3 cloves garlic, minced
1/2 tsp salt
1/4 tsp pepper

Directions:
First, cut the steak if you bought a whole one.  Place steak in a bag along with 1/4 cup olive oil ,the Worcestershire sauce, garlic, salt and pepper.  Let marinate a minimum of 8 hours up to overnight.

Chop up the onion and pepper into big chunks.  Slice the zucchini into thick pieces.  Drain the marinade from the steak.  Push pieces of pepper, steak, onion, zucchini, and tomatoes onto skewers.  Drizzle some olive oil on the vegetables and sprinkle with salt and papper.  Grill the kabobs on medium heat until the veggies are cooked.  I prefer my steak rarer, so my concern are the vegetables.

Monday, April 11, 2011

Pulled Pork BBQ


This is a recipe that's been in my book for a while.  It's super easy and very yummy.  It's so easy to change it up and make it your own by changing up the sauce and beer you use.  Today I used Kraft's Honey BBQ Sauce (my personal favorite) and Moosehead Lager (what was in the fridge).   Also, we put more BBQ sauce on top of the pork after we put it on the bun.  It doesn't say to do that in the recipe.

Ingredients:
2 pork tenderloins (about 1.5 pounds)
1/4 teaspoon garlic powder
1/2 teaspoon salt
1/4 teaspoon pepper
1 large sweet or yellow onion, chopped
3/4 cup bottled barbecue sauce (your choice)
1/2 cup non-alcoholic amber beer or light beer

Directions:
Coat the inside of the slow cooker with canola cooking spray. Place the pork tenderloins in the bottom of the slow cooker and sprinkle the garlic, salt, and pepper evenly over the top.
Sprinkle chopped onions over the pork and top that with the barbecue sauce and beer. Add the cover and cook on LOW for 8 hours. Shred the pork with a fork and stir to combine all of the ingredients.Serve the pork filling on a whole grain bun or roll.

Unfortunately, since I've had it for a while, I can't tell you what the source is.

Cinnamon Pull apart Bread


I tried this recipe for cinnamon pull apart bread.  A friend brought over cream cheese frosting to put on top.  Without the frosting I found it to be kind of chewy.  It's also possible I overcooked it.  With the frosting it was delicious!  Something yummy for an occasional saturday morning or for a brunch with friends.

Sunday, April 10, 2011

Overalls for Munchkin!


I made these great little overalls for Munchkin to wear this summer.  I used butterick pattern 5625 and it was really easy to make.  The fabric is a sheet I bought at the thrift store for $2.

Friday, April 8, 2011

Flower Easter Basket Tutorial


I really wanted to make my own easter baskets for the girls.  Since felt is so cheap and easy to work with it became the obvious choice.  

Supplies Needed:
 - 1/4 yd felt (multiple colors if you want to)
- Empty cereal box or similar food box (Mine is a graham cracker box)
- Hot Glue
- 1 Pipe cleaner (6 1/2" long)
- Piece of plastic canvas
- Pattern Pieces (when you look at the doc it shows blank, but when you go to print it's fine)


Cut out 1 circle in felt and one out of your box.  Cut 7 petals.  Cut 2 1" wide strips for your straps in felt and 1 1/2" wide piece of plastic canvas.  I cut out a 2nd 1" piece in pink and glued it around the inside of my basket for extra security.  I don't think it's needed.   Using the petal pattern provided, put straight pins in at the marked points on 4 of the 7 petals.


Glue the circle felt to the piece of cardboard. 


Put a line of glue along the bottom of the first petal with pins in it and attach to the side of the circle.  Put a line of glue along a 2nd petal (one with no pins) and put it on the circle overlapping the first petal by 1/4".


After you have your 2nd petal attached, put a line of glue up the side of the pinned petal stopping where the pin is.  Lift the petals up and push them together where its glued.

Repeat the last 2 steps until you are around the whole way.  You'll have to glue both sides of the last petal.


It should look like this.  You can now remove the pins.

Take the first handle piece and run a strip of glue down it.  Attach the plastic canvas to it.  Then glue the other strip on top of the canvas.  (sorry I don't have pictures of this)  Glue the handle to the inside of the basket.

FOR THE BUTTERFLY:


Cut 2 wings out of felt and fold the pipe cleaner in half.  Twist the pipe cleaner together leaving the top  3/4 inch untwisted.  put a line of glue along the tab part of one wing and overlap the wings at their tabs.  Glue your twisted pipe cleaner on top of the center of the wings.  You can then curve the open ends of the pipe cleaner to make the antennae.   Glue the butterfly onto your basket wherever you want it!


Fill it with any easter goodies you want and enjoy!

I'm participating in a Spring Link party at

Photobucket


Wednesday, April 6, 2011

Shadow Puppets


These are the shadow puppets I mentioned in a previous post. My step mom suggested that they'd be perfect in a vase.  I don't have a vase, so this spaghetti sauce jar will do.  I plan on decorating it in a future post.


These are the bugs and flower I made for the "Grasshopper lost his hop" play I made up

This is Goldilocks and the 3 bears the modern version.  I didn't have porridge, beds, or chairs, so I went with ice cream and boots instead.

These are the other ones I made to do random stories with.

I really do think the cricut worked really well.  I had a lot of fun finding shapes to do and it was easy to do 20 (the number of dowel rods I had).

Monday, April 4, 2011

Picket Fence Centerpiece


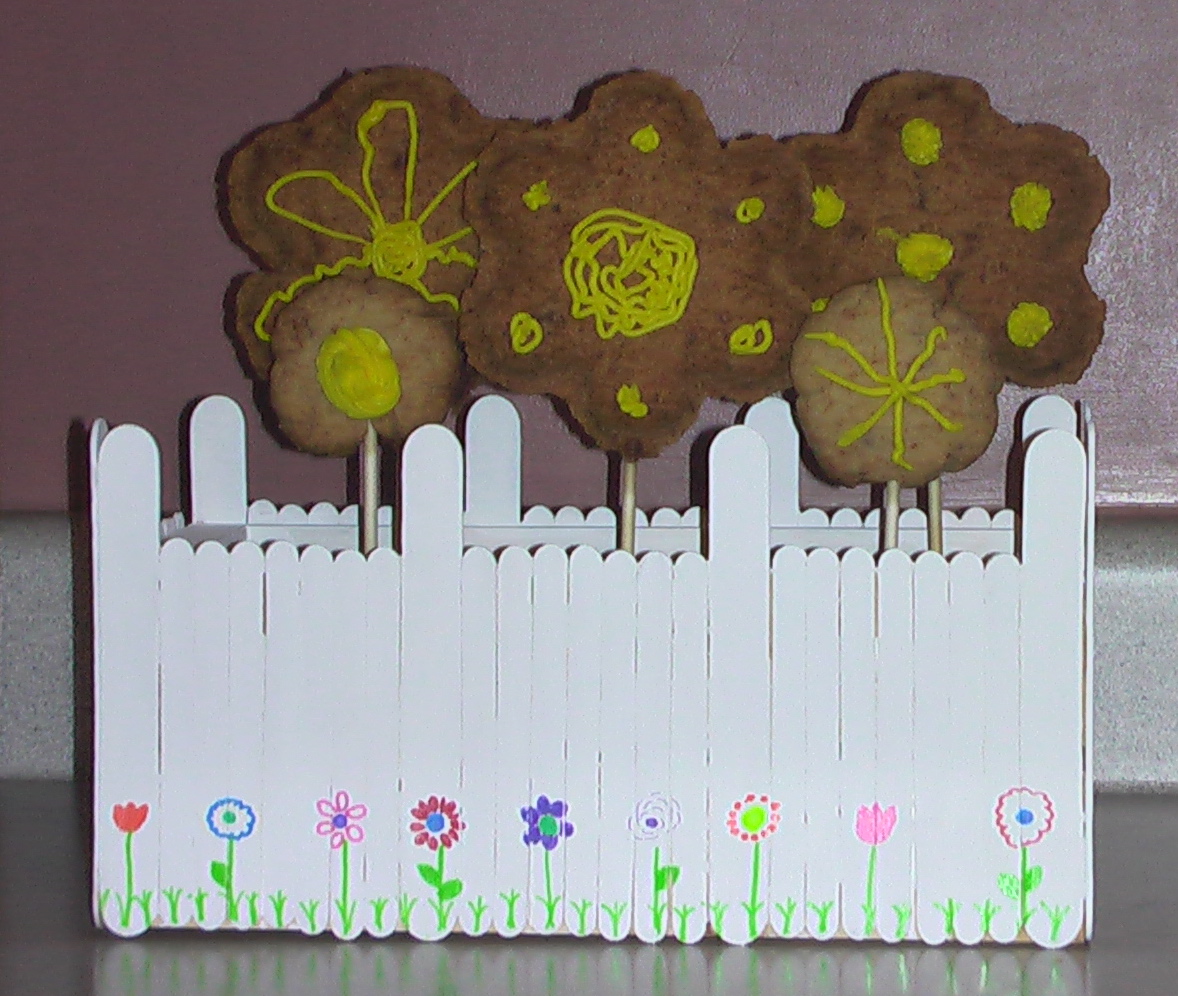
Other than the cookies turning out not so great, I really love how this turned out.  I love all my little flowers and I think it has a great picket fence look.    

So, here's how I did it:


First I painted the top and insides of my crate.

Then I glued popsicle sticks on the sides.  The long sides are a 1 large 7 small pattern and the short sides are a 1 long 11 small pattern.

Then I painted it all white. It took 2-3 coats.

I used paint pens to paint flowers and grass all around

Here's the other side

I used the wilton's cookie pop pan to make the flowers and a not so great sugar cookie recipe.  I only used that recipe because I didn't have the butter most commonly found in sugar cookie recipes.  I plan on trying the recipe that came with the pan in the near future.

Thursday, March 31, 2011

Jigsy's Old Forge Pizza


Jigsy's Old Forge Pizza is in Enola, PA.  It is an amazing and unique pizza.  They say the pizza style is from up in Scranton, PA.  I can't vouch for that, but I don't really care either way.  I LOVE this pizza.  It is something I've really missed since moving to Michigan.  My parents came up to visit this past week and were kind enough to bring me some.  Needless to say, it was everything I had hoped it would be.  I can't wait to visit PA and eat some more!

Wednesday, March 30, 2011

Tutorial: Cutting Craft Foam with the Cricut

I was fortunate enough to get my hands on a Cricut for a few days this past week.  There were two projects put on hold by the unfortunate demise of mine.  The first was shadow puppets for Peanut's puppet theater and the second was foam easter egg magnets for her to decorate.  So, after doing the projects I can now share how I managed to cut craft foam with my cricut using a deep cut housing and blade.

Set the speed to 2
Set the pressure to 4
Set the blade number to 5 (more than 5 cuts into the mat)

After its done cutting you'll need to pull apart the shape from the leftover foam.  With the blade set at 5 it wasn't very hard.  Its not perfectly smooth on the edges, but plenty smooth for my needs.

Sorry I don't have any pictures of the process.  One of these days I'll be able to replace my broken camera.

Monday, March 28, 2011

Pasta Roni with Chicken and Peas


It looks and tastes pretty good considering what it is.  It's a box of angel hair and herb Pasta Roni mixed in with some Blue Ribbon Naked Nuggets and frozen peas.  We got the naked nuggets at Costco and they're tasty.  They're little nugget shaped pieces of breast meat that have been pre-grilled.  All I have to do is saute them in a pan for a few minutes to heat them up.  Anyway, as far as a meal while on my own is concerned, this is pretty fancy.  I'll probably do it again some time.

Pasta Roni with Chicken and Peas

1 box Angel Hair Pasta with Herbs Pasta Roni
10 Blue Ribbon Naked Chicken Nuggets
1 cup frozen peas
2 tbsp margarine
1 1/3 cup water
2/3 cup milk

Heat up margarine in a medium skillet. Saute the chicken nuggets in the butter for 4 minutes on each side, until warmed.  Add in water and milk; bring to a boil.  Stir in pasta, seasoning packet and peas; return to a boil.  Simmer for 5-6 minutes, until pasta is cooked.  Remove from heat and let sit 3-5 minutes so sauce will thicken.

Sunday, March 27, 2011

Sneak Peak


This is the start of a project I'm entering into a crafting contest.  The paint is taking a while to dry so this won't be done for another day or two.

In other news, I broke my Cricut. Unfortunately, there won't be any new cricut posts for a while.

Thursday, March 24, 2011

Honey Glazed Pork Chops with Mashed Potatoes and Roasted Broccoli


I found this recipe a couple weeks ago in the Sunday paper.  I really like pork tenderloin and I have yet to be disappointed in a recipe I've tried.  I did my standard "that's not enough garlic. I'm going to double it" adjustments.  I also don't have an oven proof pan so I cooked the pork in a skillet and transfered it to an 9x13 pan for cooking.  I over cooked the broccoli and undercooked the potatoes, but it was still amazing.

So, Here's the recipe.

Honey-glazed Pork with Garlic Mashed Potatoes and Roasted Broccoli
Serves: 4 / prep time: 25 minutes Total time 50 minutes

1/2 cup apple juice
2 tbsp honey
1 tbsp soy sauce
4 cloves garlic, minced, divided
1 1/2 lbs pork tenderloin
1/4 tsp cayenne
4 cups broccoli florets
2 tbsp olive oil, divided
1/2 tsp salt, divided
1 1/2 lb yukon gold potatoes
1/2 cup sour cream
1/4 cup chopped broccoli

Preheat oven to 400 degrees.

Combine apple juice, honey, soy sauce and half of the garlic in a small bowl.  Sprinkle pork with cayenne.

Place the broccoli on a baking sheet and drizzle with 1 tbsp of the oil, toss to  coat and sprinkle with 1/4 tsp salt.


In a medium ovenproof skillet, heat the remaining 1 tablespoon oil. Add the pork and cook, turning once, until browned, about 8 minutes. Remove from heat. Pour juice mixture over pork and transfer to oven along with the baking sheet of broccoli. Bake until pork and broccoli are done, 25 to 30 minutes.
Meanwhile, cut the potatoes into slices and put them in a medium pot. Cover with cold water and bring to a boil over high heat. Cook until tender, 20 to 25 minutes.
Remove the broccoli, but leave on the baking sheet. Remove the pork and transfer to a cutting board. Return the skillet to high heat and cook juice mixture until a thick glaze forms, 3 to 4 minutes. Remove from heat.
Drain the potatoes and return to pot. Add sour cream, parsley, remaining 1/4 teaspoon salt and remaining garlic. Mash until smooth.
Slice pork on a diagonal and put on plate. Drizzle with glaze and serve with mashed potatoes and broccoli.
Adapted f rom Prevention magazine, March 2011 issue.

Wednesday, March 23, 2011

Monday, March 21, 2011

I'm still here!

I haven't forgotten about this.  I haven't even been side tracked by other things.  I've been working diligently.  Unfortuntely, I just don't have anything to show for it yet.  I've been attempting to make a bunny pattern similar to the owl.  After 2 attempts, it's still a failure.  I'll keep trying, but for now I've started making dresses to sell on Etsy.  I almost have the first one done.   So, keep a lookout for it!

- J

Monday, March 14, 2011

Introducing Oliver and Olivia


These little owls are now for sale on Etsy!  Well, the pattern is.  You too can make your very own owl plushie!  Took me a few days longer than I hoped, but I finally got the pattern made, and boy, aren't they adorable?  So, go quick and buy yours today!

Sunday, March 13, 2011

Dresses!


I am in love with these dresses!  I used a pattern I found online and I think they turned out beautiful!  Some people prefer the bigger one, others prefer the smaller.  I love them both, but I think the bigger one is just amazing.  I've already emailed the person who's pattern I used and she gave me permission to make and sell them on Etsy!  I cannot wait to get started and I hope that they sell!  Since these are a gift for my friend's children I need to make a pair for my girls.

Thursday, March 10, 2011

Some Bunny to Love


This is my submission to the Makia Contest.  It would be very cool if I won.  If not, you'll probably see this little guy on Etsy.

Wednesday, March 9, 2011

Pizzaiola Style Steak


On Saturday when there was nothing else to watch, we turned on Rachael Ray's 30 Minute Meals.  She made Pizzaiola-Style Flank Steak Pinwheels.  They looked so good that I wanted to try to make them.  As an FYI, my first rule when making one of her 30 minute meals is, it takes me way longer than 30 minutes to make.  Also, butterflying a steak isn't as easy at it looks.  So, here are my modifications to the recipe:


I used pizza cheese and grated parmesan in place of the shredded provolone and Pecorino.  I also couldn't find canned plum tomatoes and so I used a can of italian seasoned tomatoes.  I had to use curly parsley instead of flat leaf because I couldn't find flat leaf in my grocery store and I didn't think it warranted searching for it.  I didn't do the garnishes because Papa B and Peanut couldn't care less about that stuff and why spend money on things like that?


The Verdict:


This meal was DELICIOUS!  That is a picture of what I had on my plate and it filled me up along with some frozen snap peas I cooked(microwaved).  It was a little spicy, but not too much and full of flavor.  The only issue I had while cooking it was that the meat took an extra 5 minutes.  When I first took it out and cut into it some of the middle was still raw.  I'm all about pink inside, but not raw.  We will definitely be keeping this recipe but saving it for special occasions because of the cost involved.


-J

Saturday, March 5, 2011

Secret project

I'm still catching up on Christmas gifts. Fortunately my friend is very forgiving. As soon as I give it to her I'll be sure to post pics. I think it's the prettiest thing I've ever made to date.

Tuesday, March 1, 2011

Konbit Sante finished product

Here is a completed birthing kit for Konbit Sante. The blankets are 2 sided. The side you see is flannel and the other side is solid cotton. I bought 1 yard of each, squared them, and then just sewn around the edges leaving a hole to flip them. Then after I flipped it right side out I did a top stitch around the edges to close up the hole. Easy Peasy.

Monday, February 28, 2011

Konbit Sante


As mentioned in my previous post, we are working on birthing kits for women in Haiti. These are the stuffed animals I made for the kits. I made my own pattern for the owls using the ones I found here, on Etsy. I then got bored making owls and drew up my own pattern for the bunny.

Sunday, February 20, 2011

Peanut's 3rd Birthday Party


Here are the pics from Peanut's birthday party! I love how everything turned out. The cake was amazing and everyone seemed very impressed. The flowers were made using Martha Stewart's tutorial. Each one is actually 2 pom poms that were then attached to a piece of dried bamboo. The tissue paper came from the dollar store and the bamboo from my Stepmom's gardening supplies. My Stepmom and I used plaster paris to put the bambo into the flower pots (Target, 2/$1.00). The cake was home made using a bundt cake pan, 2 boxes of white cake mix, and food coloring. The balloon rainbow was 6 dollars from a party store and the white balloons are filled with regular air. We had rainbow chip keebler cookies and hand dipped chocolate covered pretzels. The pretzel rods were from the dollar store (2 bags at $1 a piece) then, we rolled them in melted white chocolate chips and rolled them in sprinkles. They were delicious.

The favors were plastic totes from Michales ($1 each). In each tote was a twisty straw (bag of 6 at dollar store), a kleidoscope (1.74 on clearance at target), a big old fashioned rainbow lollipop (dollar store), and a little baggie with pony beads and a piece of elastic to make bracelets. I also put their names on the front with paint markers to make them more personal. When the kids first got there they sat at a table and made rainbow bracelets with the beads. The other activity I had planned was a color treasure hunt. The premise was that the cake was white and the kids had to find an object in each color in order to fill the cake with color. I made two part clues to find each object. The first part was to figure out what color they were looking for and the 2nd was to find out what object they were looking for. We had a red flower, an orange pig, a yellow bird, a green present, a blue crown, and a purple birdhouse. Here is a picture of the flowers. I thought I had pics of the others, but I can't find them.


Sunday, February 13, 2011

Birthday Banner


This is the banner I made for Peanut's birthday party using the circut. I'm going to use yarn and a hole punch to hang it by punching holes in the sides and stringing the yarn through. I can't wait to see what it looks like hung up.

Thursday, February 10, 2011

Birthday Cake Topper


I was very inspired by the little girl cake toppers you find on lots of blogs these days. Specifically this one: http://buggieandjellybean.blogspot.com/2010/04/its-official-i-am-mommy-of-4-year-old.html. So, I decided to try my hand at making my own. The dress is a lot harder to make than what I thought it would be at first glance. I'm still really happy with how she turned out and I can't wait to put her on top of Peanut's cake.

Tuesday, February 8, 2011

Birthday Party Invites


I can't believe Peanut is turning 3! We will be heading to PA to throw a birthday party so our families can attend. This is the front of the invitation I made using the Cricut.