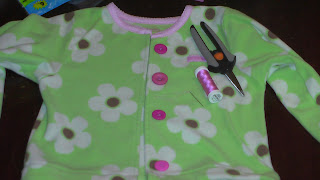
I had these pajamas in a bag of clothes I got from Freecycle. If you aren't familiar with freecycle, its a group you can join where people give things away in order to keep them out of landfills. Not everything is "trash". Most often its stuff they just don't want anymore. So, I got a bag of clothes in 4T for Peanut and these were in it. Spring is here (finally!) and so I don't really have a use for fleece pajamas. What I do have a need for is a spring coat for Peanut to play outside in when its cooler and/or windy. Enter in the Pajamas into a Coat craft!
What you'll need:
1 pair of fleece footie pajamas
3-4 buttons
scissors
coordinating or matching thread
sewing machine
Directions:
First thing I did was try them on Peanut and mark where her waist was with a pencil.
Then I ripped the seams on the zipper with my stitch ripper down to well below my mark.
I actually ended up using a new t-shit of Peanuts to gage the length. I marked the bottom of the shirt and added an inch. The shirt was pretty long, so the coat ended up being the right length.
I then rolled up a 1/4 inch along the bottom then another 1 inch. I wanted the bottom to have a wider hem to look more like the bottom of a regular coat. I did a 7/8 inch hem from the bottom. Its not so important that the inside is straight, but that the outside hem is straight since that's what people will see. So, focus on sewing straight along the bottom rather than making sure you are straight along the inside fold.
Next I cut 4 1"x5" strips out of the scrap material from the bottom half of the pajamas. I then folded them in half right side out and pinned them. I put them in my machine and did a straight stitch down the middle of each one.
I then trimmed the raw edge really close to the seam.
Then I laid out my 4 strips along with my 4 buttons to decide placement. You could also do 3 buttons if you wanted. It just depends on how you want the spacing to be. It's also hard to tell, but my buttons are different.
I used a pen to mark where I wanted each button to be.
Then I hand sewed the buttons on with my blue dots right in the middle of the button.
Then I took my strips and tucked them in the buttons and pinned them onto the other side where I thought they gave enough tension to stay on. I sewed the strips on running the stitch across each strap 5 times (down, up, down, up, down) 7/8 inch from the center edge of the coat. I then went another 1/4" out and repeated for strength. I trimmed the strips 1/4" out from that.
Here is a close up of the 2 seams and how I trimmed it. Also note the factory made wavy hem up towards the top. Good to know even the factories aren't perfect stitchers!
The finished product! A simple coat for Peanut to wear outside. I went from something I probably wasn't going to use to something Peanut needed. Total cost to me $0.
Peanut posing in her new coat, which she says she loves. Her hands are up because she's making a funny face while posing for the camera.


No comments:
Post a Comment