Thursday, September 29, 2011

Shopping Bag Holder Tutorial


You'll need:

1/2 yard of fabric, 24" of elastic and 14" of ribbon


1) Cut your fabric to 18"x20".  The 20" will be the length of the holder and the 18" will be the circumference.


Fold your fabric in half lengthwise and sew a 1/2 in seam along the open long edge to make a long tube.


Next, Fold over your top and bottom edges twice about 1/4" to make the casing for the elastic.  Sew around them close to the inside edge of the fold leaving an opening about 1 1/2 inches wide to slip your elastic through.


Here you can see the top and the bottom hems sewn with the openings going over the seam.


Cut your elastic into 2 pieces, one that is 10" long and the other to 14" long.


Next,  put a safety pin through one end of the 10" elastic piece.  This will be bottom of the bag.  Thread it through one of the casings making sure to hold on to the free end.


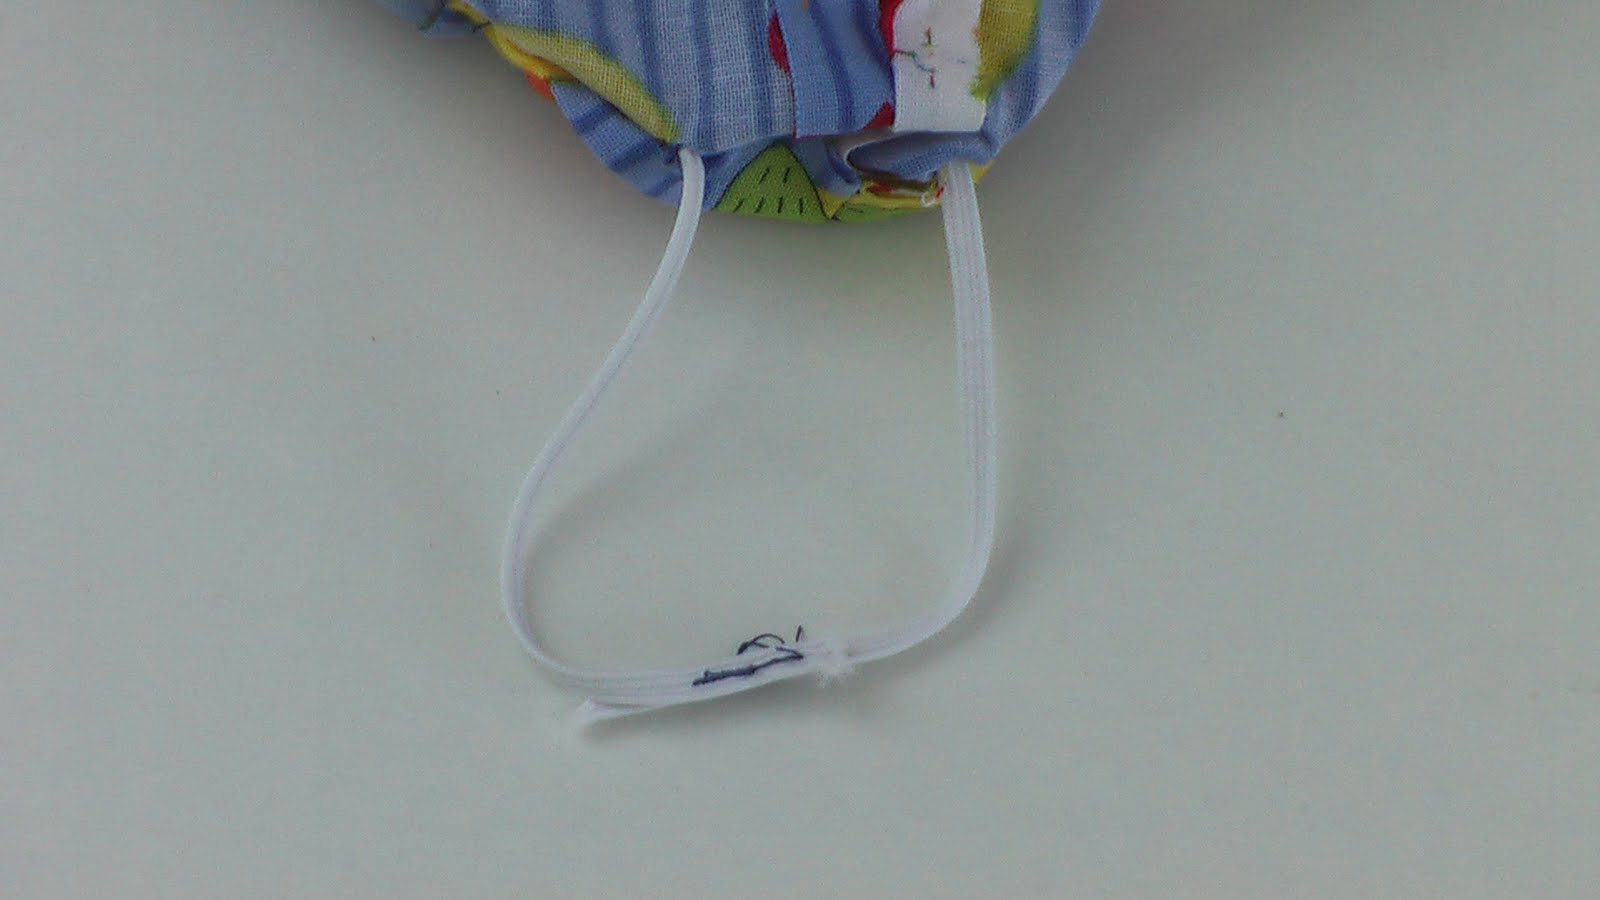
Machine stitch them overlapping  to make sure they hold.


Sew the opening in the casing closed.


Repeat for the 14" elastic.  


Next, take the ribbon and cut it to 14" in length


Sew the ribbon to the top of the bag placing the ends on opposite sides.  Stitch once along the stitch line from the hem and then again close to the top for added durability.  Turn right side out and your done!


Here are the before and after pictures of underneath my cabinets in the kitchen.  I love when I can sew to solve a real problem in our lives.  Well, that makes it sound like we couldn't lead fulfilling lives with the bags under the counter like that.  It was just a nuisance, especially since Munchkin decided she likes to pull them out and toss them all over the house.


Wednesday, September 28, 2011

A Frame Tent

Whilst chatting with a close friend one night she mentioned she was making this A-Frame Tent from Cakies as a gift for a little boy she knew.  I thought it was a really cute idea and something pretty easy to make.  I'm not sure if it was later that night or a few days later, but I mentioned to her that I was having trouble coming up with a birthday gift for her daughter.  She said her daughter was pretty excited about the tent she was making and would probably love to have one of her own.  I thought it was a good idea, and who am I to disappoint a 3 year old for her birthday?

It took me longer than expected to collect the wood pieces.  I sent my husband to Lowes one day to get other things we needed and added these to the list last minute.  He was not able to find them at Lowes.  This doesn't mean Lowes doesn't carry them.  So, if you plan on making this tent don't avoid Lowes.  It just means my husband may have had his eyes shut when looking.  A week or so later I went to home depot and found them with the help of an employee.  (I'm sure there weren't any employees available to help my husband when he was searching.)

I immediately had in my head what fabric I wanted to use.  I knew I had this old vintage sheet with a great color palate and pattern.  When I finally went though my stash and found it I was disappointed to find out it was a pair of pillowcases and not a complete sheet set or even 1 sheet.  Not "feeling" any of my other fabric, I decided to forge ahead.  I found another set of sheets that I thought coordinated well and went to work.  I ended up making a border with the beige sheet around 2 opened pillowcases.  I don't have a picture of the bag, but after making the tent and the bag I literally had a couple 1.5" by 3" pieces of the blue fabric left.


Since the wood was "hard" to find the first time I did buy enough to make one for Peanut as well.  After having this set up in my living room for about 10 minutes I've decided its going to be a gift for both girls as neither one of them wanted to get out.  I'm not sure when I'll get that done in my schedule, but it's on the list....along with about 30 other projects.

Thursday, September 22, 2011

Bambo Knife Review

I am a member of Haute Look.  I get their emails daily and sometimes things look interesting. Most things are too expensive, but I love to window shop and it's fun to look at the styles they sell.  A few weeks ago they offered a sale for Core Bamboo.  I looked over all the products and a few things intrigued me.  The idea of a bamboo knife.  I don't remember which ones they had up for sale, but I know I ended up with the chef's slicer.

I was pretty excited to get it in the mail.  Papa B is a "knife guy" and so he was also intrigued.  At dinner I pulled out the knife and sliced an apple.  I was pretty disappointed right away.  It took mostly force and little actual "cutting" to slice the apple in half.  I felt like it wasn't sharp enough.   So, we all partook in the apple and the knife was washed and put away for later.


A few days later when getting ready to make mashed potatoes Papa B asked if I wanted to try it out again.  I didn't really want to, but I did.  I found it hard to do the first cut of the potato in half, but as long as I sliced keeping the tip of the blade on the board it worked really well for the rest of the cutting.  I was presently surprised.

I'm excited to keep this new knife in the drawer and getting to use it.  I do wonder how to sharpen it, if possible.  Maybe this knife will become one of my new kitchen utensil must haves.  Only time will tell!


Tuesday, September 20, 2011

Flower Cut Out Shirt: A Tutorial

Sorry it took me so long to get this up.   I should probably just stop giving time frames so that I don't fail to meet them.  Speaking of which, I didn't make my 5 project completed by Monday goal.  I only managed to get 3 done.  Fortunately, 2 of those were really important. So, at least there is that.  Onto the tutorial!

Supplies Needed:
1 shirt
scraps of fabric
scraps of paper
Thread to match the shirt color
pencil
Fabric marker that will wash out
Pinking sheers

Step 1:

Using your scrap paper, draw the shapes you want the cut outs to be and lay them on your shirt.  For mine I decided to make 3 flowers.  The flower shapes are actually cardstock flowers from scrapbooking leftovers.  Keep in mind the cutouts will be slightly smaller than the pieces you use.

Step 2:

Using your washable fabric marker, trace the outline of all the shapes.


This is what it should look like when you have traced them all.

Step 3:

Cut out pieces of fabric larger than the shapes.  I laid mine out like this so I knew where the different pieces went as I pinned them to the shirt.

Step 4:


Pin the fabric to the inside of the shirt making sure to stay outside your trace lines with the pins.


This is what it should look like on the outside of the shirt.  Double check to make sure you don't have any pins going over your lines as you'll be sewing on top of the lines.

Step 5:


Sew along all of the lines you traced.  


This is what it should look like on the inside.

Step 6:


Use the pinking shears along all the edges of the fabrics to prevent fraying later on.


Here is a closeup of one of the flowers.

Step 7:


On the front of your shirt, very carefully cut out the shirt leaving the fabric behind.  Trace around the shapes leaving about 1/4 inch border from where your stitches are.

Step 8:


Snip around the edges making a frilled edge making sure not to cut through the stitches or your behind fabric.  The frilled edge will make it fray once you wash it.

Step 9:


Throw the shirt in the washer and then dryer.  That will get rid of all the marker and also make the edges fray. 

Step 10:


Put it on your toddler along with Faerie wings and your done!


Thursday, September 15, 2011

Cut out Flower Shirt


Today I finally got around to making this shirt for Peanut!  I got it at Target on clearance for 3.50 a few weeks ago.  I've had the idea of doing cut out flowers on it since I bought it, but it wasn't until today that I was able to actually come up with a specific plan.   I'll be doing a tutorial on how to make one of your own in the next couple days.

Just as a note, this is a boy's shirt.  It was with the boys' clearance.  Also, I was super tempted to make this into a jack o' lantern shirt.  I'm going to go out looking for orange long sleeve tees to make into jack o lantern shirts for the girls using the same method I used in making this one.

Stay tuned!

Wednesday, September 14, 2011

Working on it!

So, I'm very busy working on a number of things.  My goal this week is to (finally) finish my sister's wedding gift, make 1 christmas gift, 1 birthday gift, and then complete 2 other projects (to be determined as I get to them).  I'm very much on track with the wedding gift and I've started the christmas gift.  I need something for the birthday gift and I'm waiting to get that until Friday.  Not sure what the other 2 projects are going to be yet.  So, though I'm not posting, I am very much working.

Also, coming soon is CAN we do it? Yes, we CAN! Week.  A whole week devoted to the things I've canned these past few months.  Let me know if you want to join in on your blog too and we can link! Yay!

Friday, September 9, 2011

Bananas Foster

I have never had bananas foster before.  But when I saw Duff Goldman make them on The Talk a couple weeks ago, I knew I had to try it out.  It was just full of yummy things so how could it be bad?  It didn't take much convincing to get Papa B to buy the liquor for it.  Unfortunately we didn't have any of the liquors on hand so we had to buy all 3.  It cost us over $30 for the small bottles.  So, if you plan on making this, I hope you already have the booze on hand.


Doesn't it look yummy?  It was delicious! We've been talking about making it again already.  Why not?  We already have the liquor now.  There's definitely enough for a few more runs.   So, here's the recipe:

Bananas Foster:


Ingre­dients:
4 bananas
1/4 cup (1/2 stick) butter­
1 cup brown sugar­
1/4 cup banana liqueur­
1/4 cup dark rum
1/4 cup Grand Marnier
1 pint of vanilla ice cream
Whipped cream
1 tsp. freshly ground cinnamon

Directions:
Slice the bananas about a 1/4 inch thick. Place the skillet over medium heat and melt the butter and brown sugar. Once the butter and brown sugar are melted, turn up the heat to high. As soon as the liquid starts bubbling, add the sliced bananas. Gently toss the bananas in the liquid to coat and lightly caramelize them, paying close attention to not overcook. Once coated, remove the pan from the burner, then add the Grand Marnier, dark rum, and banana liqueur. Place back on the burner, tip pan slightly until the liquor ignites, being careful not to spill - the flames will burn off the alcohol. Once flames subside, remove from burner.
Spoon warm sauce over ice cream scooped in bowls and top with whipped cream and freshly ground cinnamon. Serve immediately.

Wednesday, September 7, 2011

Fabric Belt: A tutorial

Ack! I can't believe it's been a week!  I kept saying "I'm too tired tonight.  I'll blog tomorrow." and now a week has gone by!  I've been so busy sewing and cooking.  I have so much stuff to blog about!  I just need to spend the time writing about it.  So, here is a post I meant to write back in May and never did.


So, I have been losing a bit of weight.  I don't really have any belts and so I set out to make one.  I made one of these belts for Peanut for Christmas and it was so easy and cheap I decided to make one for myself.

Fabric Belt Tutorial:


Supplies:
5/8" wide stitch witchery
2 - 1" D rings
Scrab of fabric min 38"x4"


First, Measure around your waist (or the waist of the person you are making the belt for).  You will want to cut your fabric to that number + 6".  So, your fabric will be The waist+6" by 4".  Cut the stitch witchery to the waist + 6" number.


First, Fold the fabric in half and iron it flat.


Open it up and fold the two outer edges into the middle.  Iron it flat.


Lay the stitch witchery down along the one half side.  Then fold it half again.  It should now be in 4ths with the raw edges in the middle.  Iron it until the stitch witchery melts and it all holds together.


This is what it should look like with the stitch witchery in the middle


Sew as close to the edge as you can down both long sides for extra durability


Put the D rings on one end and fold over about 1 inch and then stitch at the raw edge.  If your raw edge isn't surged, fold it under before stitching.  On the other end fold it under twice and sew.


That's it!  Super easy.  Put your new belt on and take it out on the town!