Wednesday, February 22, 2012

Heart Party: Pin the Heart on the Bear


One of the games I planned for Peanut's birthday party was Pin the Heart on the Bear.  I made this felt bear and a pile of felt hearts with velcro.  To make the pattern I used Ikea's paper roll (best $5 bucks ever).  I drew out each piece, then cut it out and laid it on my floor.  My freaky bear pattern looked like this:


I colored some of the pieces in just to help me visually.  Everything is a separate piece and just laid out together.  I then used the pattern pieces to cut out the brown felt.  To give you an idea of the size, the red is 2' x 3'.  I would be more than willing to share the pattern pieces with anyone who might want them.  Just email me or leave a comment.

After I cut everything out I just pinned it to the red and sewed them on using 1/4" seam around the edges of each piece.  I started with the body and worked up the layers.


Here's a closer look.  You can see the seems.  After I finished the bear I folded over the top and sewed a line along the top to make a pocket for my dowel rod.

For the hearts, I cut 2 hearts of each color.  ironed on the rough part of the velcro onto one, and then did a blanket stitch to attach the two heart pieces together.  Each kid got a different color.  I wish I took pictures of what the bear looked like after the game.


Why, hello there.  Will you give me a hug?


Sunday, February 19, 2012

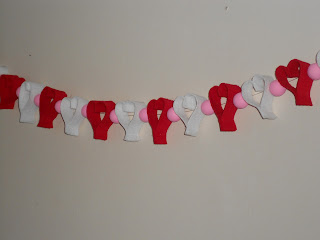
Heart Party: Heart Garland


I saw this beautiful heart garland on Pinterest.  The original pin I found linked me to a site in a foreign language.  So, I just looked at the pictures and did it on my own.  I have since found a blog on Craftzine that gives a tutorial.


I did two things differently. I used wood balls instead of felt ones.   Also, I used craft felt.  I don't have the money for wool felt and I have no idea where to find felt balls.

I noticed right away that my felt wasn't stiff enough to hold the heart shape.  So, I had to figure out how to fix it.  To stiffen the felt I watered down Elmer's glue and painted the hearts. 

I laid them out to dry, and to my amazement, it worked great!

To paint the balls, I took strips of tin foil and rolled them into thin tubes.  I then threaded the balls onto the foil.  The foil was stiff and thick enough to keep them still and separate, perfect for painting!


Wednesday, February 15, 2012

Heart Birthday (Not Valentines!) Party

I can't believe my little girl is 4!!  Her birthday was this past Saturday and she requested a heart birthday party.  Since her birthday is just 3 days before Valentines day I felt very much up to the task.  I had a ton of ideas, and as usual, things got crossed off the list as the date loomed closer.

Heart bunting in the kitchen

A very happy little girl with the dessert table.  The cookies on the left are peanut butter blossoms with heart shaped chocolates instead of the typical Hershey kisses.  On the right are heart shaped jello jigglers.

The dessert table

Cupcakes!

The hearts are rings. Always a big hit with the little ones!

The 4 candle is bigger than the cupcake!

Peanut dancing in her birthday dress
Hearts hanging between the kitchen and the living room

Pin the heart on the bear game

Velcro hearts for the pin the heart on the bear

Bean bag toss

Bean bags in basket from Dollar Tree

Heart garland


A very happy birthday girl!

I'll be putting up posts on the dress, decorations and games.  Everything was made by me.  All were designed by me except for the heart garland on the bottom.  That I got form pinterest.

Thursday, February 2, 2012

Happy Groundhogs Day!

Groundhogs Day is special in our house.  Papa B has a hunting cabin outside of Punxsutawney, PA and it's where we got married.  We got married at the cabin and had our reception at the Pantal Hotel.  We've only managed to get to camp for Groundhogs Day once in our 10 years together, and we slept in too late to go to the festivities.  However, I did get to go once as a teenager.  My parents took me up and it was a ton of fun.

Ever since the year we went to Punxsy my family had a tradition of making groundhog shaped cookies.  The cookies are then placed on a scoop of vanilla ice cream (snowy mound) and drizzled with chocolate sauce (shadow).  My step mom was super awesome this year and sent us a package containing the groundhog cookies.   Peanut was very excited to open her package today and even more excited at the prospect of cookies and ice cream.  She even ate all of her dinner so she could have dessert.

Here's the recipe for the cookies.  It's a basic spice cookie recipe, but this one comes from the Punxsutawney Phil's Official Souvenir Shop!  Therefore it must be special! Right?!

Spicy Groundhog Cookies

Ingredients:
2 cups flour
1/2 tsp salt
1 tsp baking powder
1/2 tsp baking soda
1 tsp ground cloves
1 tsp ground ginger
1 1/2 tsp cinnamon
1/2 cup soft butter
1 cup sugar
1/2 cup molasses
1 egg yolk
Currants or Raisins
1 egg, slightly beaten

Directions:
Sift flour, salt, baking powder, baking soda, and spices together.  Set aside.  Cream butter and sugar together until fluffy.  Blend in molasses and egg yolk.  Stir in flour mixture and mix well.  Form into a ball.  Wrap in plastic wrap or wax paper.  Chill overnight.

For eas in rolling, work with small amounts of dough at a time, topped with wax paper.  Roll dough 1/8 inch thick.  Remove wax paper.  Cut out cookies with lightly floured cutter.  Place cookies on greased bakin sheet.  Brush with slightly beaten egg.  Decorate by giving each groundhog a currant or a raisin for an eye.  Bake 8 to 10 minutes in preheated 350-degree oven.

Cool slightly before removing from cookie sheet.  Makes 12 to 15 large groundhogs or 3 to 4 dozen small cookies.  Put cooled cookies in sealed container with a slice or 2 of bread to soften, if desired.

I'm sure at this point you are wondering where you can find groundhog cookie cutters.  Well, you can find them all over Punxsutawney! I'm sure you can also find them online.


Also in the care package was a pile of groundhog coloring pages and a new groundhog book!  My aunt said a few years ago, that she was going to find one and get it for Peanut.  It took her a while, but she didn't forget! (Though, I did) 


We read it at bed time tonight.  It was a really cute book.  The basic premis is that it's the first year Gretchen Groundhog has to go out to see her shadow and she's afraid.  I was a little disappointed she lived in the town of Picadilly, but that's probably because I am a bit biased.   I can't wait for this book to become part of the tradition too!

Happy Groundhogs Day!!!

(stay tuned for an easy Groundhogs day craft tomorrow)