Wednesday, February 22, 2012

Heart Party: Pin the Heart on the Bear


One of the games I planned for Peanut's birthday party was Pin the Heart on the Bear.  I made this felt bear and a pile of felt hearts with velcro.  To make the pattern I used Ikea's paper roll (best $5 bucks ever).  I drew out each piece, then cut it out and laid it on my floor.  My freaky bear pattern looked like this:


I colored some of the pieces in just to help me visually.  Everything is a separate piece and just laid out together.  I then used the pattern pieces to cut out the brown felt.  To give you an idea of the size, the red is 2' x 3'.  I would be more than willing to share the pattern pieces with anyone who might want them.  Just email me or leave a comment.

After I cut everything out I just pinned it to the red and sewed them on using 1/4" seam around the edges of each piece.  I started with the body and worked up the layers.


Here's a closer look.  You can see the seems.  After I finished the bear I folded over the top and sewed a line along the top to make a pocket for my dowel rod.

For the hearts, I cut 2 hearts of each color.  ironed on the rough part of the velcro onto one, and then did a blanket stitch to attach the two heart pieces together.  Each kid got a different color.  I wish I took pictures of what the bear looked like after the game.


Why, hello there.  Will you give me a hug?


Sunday, February 19, 2012

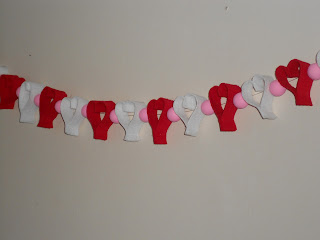
Heart Party: Heart Garland


I saw this beautiful heart garland on Pinterest.  The original pin I found linked me to a site in a foreign language.  So, I just looked at the pictures and did it on my own.  I have since found a blog on Craftzine that gives a tutorial.


I did two things differently. I used wood balls instead of felt ones.   Also, I used craft felt.  I don't have the money for wool felt and I have no idea where to find felt balls.

I noticed right away that my felt wasn't stiff enough to hold the heart shape.  So, I had to figure out how to fix it.  To stiffen the felt I watered down Elmer's glue and painted the hearts. 

I laid them out to dry, and to my amazement, it worked great!

To paint the balls, I took strips of tin foil and rolled them into thin tubes.  I then threaded the balls onto the foil.  The foil was stiff and thick enough to keep them still and separate, perfect for painting!


Wednesday, February 15, 2012

Heart Birthday (Not Valentines!) Party

I can't believe my little girl is 4!!  Her birthday was this past Saturday and she requested a heart birthday party.  Since her birthday is just 3 days before Valentines day I felt very much up to the task.  I had a ton of ideas, and as usual, things got crossed off the list as the date loomed closer.

Heart bunting in the kitchen

A very happy little girl with the dessert table.  The cookies on the left are peanut butter blossoms with heart shaped chocolates instead of the typical Hershey kisses.  On the right are heart shaped jello jigglers.

The dessert table

Cupcakes!

The hearts are rings. Always a big hit with the little ones!

The 4 candle is bigger than the cupcake!

Peanut dancing in her birthday dress
Hearts hanging between the kitchen and the living room

Pin the heart on the bear game

Velcro hearts for the pin the heart on the bear

Bean bag toss

Bean bags in basket from Dollar Tree

Heart garland


A very happy birthday girl!

I'll be putting up posts on the dress, decorations and games.  Everything was made by me.  All were designed by me except for the heart garland on the bottom.  That I got form pinterest.

Thursday, February 2, 2012

Happy Groundhogs Day!

Groundhogs Day is special in our house.  Papa B has a hunting cabin outside of Punxsutawney, PA and it's where we got married.  We got married at the cabin and had our reception at the Pantal Hotel.  We've only managed to get to camp for Groundhogs Day once in our 10 years together, and we slept in too late to go to the festivities.  However, I did get to go once as a teenager.  My parents took me up and it was a ton of fun.

Ever since the year we went to Punxsy my family had a tradition of making groundhog shaped cookies.  The cookies are then placed on a scoop of vanilla ice cream (snowy mound) and drizzled with chocolate sauce (shadow).  My step mom was super awesome this year and sent us a package containing the groundhog cookies.   Peanut was very excited to open her package today and even more excited at the prospect of cookies and ice cream.  She even ate all of her dinner so she could have dessert.

Here's the recipe for the cookies.  It's a basic spice cookie recipe, but this one comes from the Punxsutawney Phil's Official Souvenir Shop!  Therefore it must be special! Right?!

Spicy Groundhog Cookies

Ingredients:
2 cups flour
1/2 tsp salt
1 tsp baking powder
1/2 tsp baking soda
1 tsp ground cloves
1 tsp ground ginger
1 1/2 tsp cinnamon
1/2 cup soft butter
1 cup sugar
1/2 cup molasses
1 egg yolk
Currants or Raisins
1 egg, slightly beaten

Directions:
Sift flour, salt, baking powder, baking soda, and spices together.  Set aside.  Cream butter and sugar together until fluffy.  Blend in molasses and egg yolk.  Stir in flour mixture and mix well.  Form into a ball.  Wrap in plastic wrap or wax paper.  Chill overnight.

For eas in rolling, work with small amounts of dough at a time, topped with wax paper.  Roll dough 1/8 inch thick.  Remove wax paper.  Cut out cookies with lightly floured cutter.  Place cookies on greased bakin sheet.  Brush with slightly beaten egg.  Decorate by giving each groundhog a currant or a raisin for an eye.  Bake 8 to 10 minutes in preheated 350-degree oven.

Cool slightly before removing from cookie sheet.  Makes 12 to 15 large groundhogs or 3 to 4 dozen small cookies.  Put cooled cookies in sealed container with a slice or 2 of bread to soften, if desired.

I'm sure at this point you are wondering where you can find groundhog cookie cutters.  Well, you can find them all over Punxsutawney! I'm sure you can also find them online.


Also in the care package was a pile of groundhog coloring pages and a new groundhog book!  My aunt said a few years ago, that she was going to find one and get it for Peanut.  It took her a while, but she didn't forget! (Though, I did) 


We read it at bed time tonight.  It was a really cute book.  The basic premis is that it's the first year Gretchen Groundhog has to go out to see her shadow and she's afraid.  I was a little disappointed she lived in the town of Picadilly, but that's probably because I am a bit biased.   I can't wait for this book to become part of the tradition too!

Happy Groundhogs Day!!!

(stay tuned for an easy Groundhogs day craft tomorrow)


Wednesday, January 25, 2012

Jalapeno-Lime Chicken

This is the third and final orange juice recipe:

Whenever I get products and there are recipes included in the packaging, I always look.  I look for recipes in lots of places, online, in magazines, things I buy, on racks in the stores.  This recipe came out of a box of ziploc bags.  Their idea for this recipe was to make a ton of it, and then freeze the extra chicken in a ziploc bag to use later.  The actual recipe is from Taste of Home.


Ingredients
1 cup thawed orange juice concentrate (I used regular orange juice)
2/3 cup chopped onion
1/2 cup lime juice
1/2 cup honey
1 jalapeno pepper, seeded and chopped
2 teaspoons ground cumin
2 teaspoons grated lime peel
1/2 teaspoon garlic salt
2 garlic cloves, minced
10 boneless skinless chicken breast halves (4 ounces each)
Directions
In a 4-cup measuring cup, combine the first nine ingredients. Pour 2 cups into a large resealable plastic bag; add chicken. Seal bag and turn to coat; refrigerate for 2-4 hours. Cover and refrigerate remaining marinade for basting.
Drain and discard marinade. Using long-handled tongs, moisten a paper towel with cooking oil and lightly coat the grill rack. Grill chicken, covered, over medium heat or broil 4 in. from the heat for 4-6 minutes on each side or until a meat thermometer reads 170°, basting frequently with the reserved marinade.


This chicken was amazing.  I tasted the marinade after I mixed it together and was immediately concerned.  I told Papa B not to invite our friend over for dinner and that we should have a plan B in place.  I went ahead and made the meal, though I was very pessimistic with the outcome.  It just so happened that on this day Papa B had to stay late at work (this is a common thing) and so i was on my own.  I made the girls something else for dinner and prepared the chicken.  When I brought it in from the grill and put a bite in my mouth I was amazed.  It was delicious!  When Papa B finally did get home and get to taste it (around 8 pm) it was on the counter and room temp.  It still tasted good.  The next day he used the leftover chicken to make a grilled chicken and cheese sandwich.  That, was also good.  It had lots of flavor, but not too much bite.  Just writing about it makes me want it again.  Might have to put it on the menu next week...

P.S. - I made Mexican Bean and Rice Salad to go with it, but we've decided we don't like cold rice and bean salads.  I've given up trying different recipes for it and will be moving on to something else as a side.

Tuesday, January 24, 2012

Orange Stir Fry Chicken

Every month Redbook has a "Restaurant Redo" at the very back.  It's a dinner from a restaurant altered to be healthier.  In one issue (the ripped out page doesn't say) they offered a healthier version of Applebee's Crispy Orange Chicken.  According to Redbook, Applebees version comes in at a whopping 1550 calories and 58 grams of fat.  Their version has 547 calories and 13 grams of fat per portion.  I was skeptical at what a portion would be like, but man, they were HUGE!  It was a ton of food and delicious to boot.  It felt good eating something very yummy and knowing we weren't consuming a ton of calories.  The changes I made were omitting the almonds, bok choy, water chestnuts, and chinese egg noodles.  Instead, I added more of the other veggies.  I'm not sure what that does for calorie count.


Ingredients:
Sauce:
3/4 cup(s) orange juice
1/4 cup(s) honey
2 tablespoon(s) low-sodium soy sauce
1 tablespoon(s) cornstarch
1 teaspoon(s) grated orange zest
1/2 teaspoon(s) hot red pepper flakes
Stir-Fry:
1/3 cup(s) all-purpose flour
1/4 cup(s) whole-wheat breadcrumbs
2   egg whites
1 pound(s) boneless, skinless chicken breasts, cut into 1-inch pieces
2 tablespoon(s) canola oil
2 teaspoon(s) minced garlic
2 cup(s) (6 ounces) broccoli florets, blanched
1 cup(s) (4 ounces) sugar snap peas
1 cup(s) (4 ounces) sliced mushrooms
1  red bell pepper, seeded, cut into thin strips
1 bunch(es) (small) baby bok choy
1 can(s) (5-ounce) water chestnuts, drained (about 1 cup)
1 cup(s) shredded carrots
1/4 cup(s) sliced, toasted almonds
1/4 cup(s) crispy Chinese egg noodles
Directions:
Combine sauce ingredients.
In a pie plate, combine flour and breadcrumbs. In a medium bowl, beat egg whites. Toss chicken pieces in egg whites, then in flour mixture to coat.
In a large nonstick skillet or a wok, heat 1 tablespoon of the oil over medium-high heat. Add chicken and cook 4 to 5 minutes, until browned all over; remove from skillet.
Add remaining 1 tablespoon oil to skillet. Add garlic and all vegetables except carrots and stir-fry about 3 minutes. Add carrots and stir-fry 30 seconds. Pour sauce into skillet and stir-fry until sauce thickens, about 2 minutes. Add chicken back to skillet and stir-fry 1 minute, until chicken and vegetables are coated with sauce. Remove from heat; sprinkle with almonds and noodles. Serve with steamed rice (3/4 cup cooked rice per serving).


Sorry I forgot to take a picture before I got seconds.  We managed to feed 2 hungry adults and 2 kids with leftovers for lunch.  The recipe says it serves 4, so we stayed within their serving limits, which rarely happens. This recipe is definitely a keeper.


Monday, January 23, 2012

Brown Sugar Pork Chops with Onions

I am always almost always about saving money.  When I make a menu for the week I try to group recipes that use the same ingredients into it.  At least ingredients where I have to buy more than I will use for one recipe (think things like celery or cream).  This week I decided to do a new recipe week.  I have a bunch of new recipes I am excited about and wanted to try them.  3 of them called for orange juice, which is something we don't typically buy.  This was a good chance for me to buy some orange juice and maximize its cost.  I will share with you the recipes over the next 3 days starting with the first today.

Tonight I made Brown Sugar Pork Chops with Onions.  It came out of Better Homes and Gardens January 2012 issue.  They classified it as "Delicious on a Dollar" and say it costs less than $1 per serving. I'm not completely sure that's true, but since I had almost all the ingredients on hand, it was cheap to make.

Ingredients:
2 tsp. vegetable oil
4 boneless pork rib or loin chops, 1/2 to 3/4 inch thick
1/4 tsp ground black pepper
1 medium onion, halved lengthwise and thinly sliced
1/4 cup orange juice
2 tbsp packed brown sugar
1/4 tsp crushed red pepper

Directions:
In a large skillet heat oil over medium heat.  Sprinkle chops with black pepper. Cook chops in hot oil for 6 to 8 minutes, until brown on outside and slightly pink in center, turning once halfway through cooking time.  Remove chops from skillet; cover and keep warm.

For sauce, in same skillet cook onion over medium heat for 3 minutes or until tender.  Push onion aside. Remove skillet from heat; add orange juice and brown sugar.  Return to heat.  Cook and stir for 1 minute or until sugar is dissolved.  Stir onions into sauce.

Spoon sauce over chops; sprinkle with crushed red pepper, if desired. Serve with steamed green beans. Makes 4 servings.


It was really good and also very easy to make.  I did serve it along with steamed green beans and parmesan noodles (Papa B's favorite).  I don't think I added the red pepper flakes, but I'm didn't omit them on purpose, I just forgot to add them.  Also, I put the pork chops back in with the sauce, turned the heat to low, and covered it to keep it warm until we were ready to eat.  It didn't dry the pork chops out at all and they were still delicious.

Stay tuned for another orange juice recipe tomorrow!

(I did try to link to the recipe on the BHG website, but you have to be a member to view it)

Sunday, January 22, 2012

It really worked!!

Papa B put lettuce in the fridge without putting it in a bag or container.  Sadly, my lettuce wilted and I felt the sting of missing part of a meal (salad) and also the loss of money.  I figured there had to be some trick to reviving and therefore I turned to the one source I can always count on, Google.  I did a search and I found someone saying to cut the bottom off the lettuce, submerge it in a bowl of water and put it in the fridge overnight.  I was slightly skeptic but figured I couldn't be in worse position than I was currently in, a woman with a head of bad lettuce.  So, out came my bowl, knife, and cutting board.  The next morning I opened my fridge to find....A perfectly crisp head of lettuce!  It was beautiful!  It came above the water line as it plumped up, but it was all fine but one piece.  I think next time I'll use a bigger bowl. Here are pictures of my plumped lettuce!


By the way, the salads were delicious!  I'll be sure to keep my lettuce in a bag, but if it happens again at least I know how to fix it.

Tuesday, January 10, 2012

Billy Cardi

For my Sister in Law I decided to make the Billy Cardi from No Big Dill.  Drafting a pattern for oneself is a hard enough task, but trying to do it for someone else is even harder.  I drew one out and sewn (sewed?) it up using leftover peach knit from the dress (I apparently never blogged about??).  Anyway, I didn't really like it in peach, but at least I got to check the fit.  It fit pretty well, but the arms were a little funky.  So, the next day I went out and got new knit in cranberry and bought a really simple t-shirt pattern.  I used the pattern solely for the sleeves and the sleeve holes.  I also made a few other changes to the width of the back and the length.  Back to the sewing machine, and viola!


I have to say that overall, it was pretty easy.  The hardest part was moving my little cutting mat around to cut it out with my rotary cutter.  I am a strong advocate of the rotary cutter when it comes tu cutting out knits.  It makes sure that the knit doesn't stretch at all when you are cutting it.  Makes a HUGE difference.  As far as the pretty shoulders go, my machine is as simple as they come, but I felt like leaving the seams on the inside was too boring.  So, onto the good old fashioned zig zag.  I know that Katy says no zig zag in her blog, but desperate times call for desperate measures.  Here's a close up of the shoulder.


Now that its up, it's apparent how horrible of a picture it is.  Sorry about that.  Anyway, she says she liked it and it fits well.  I'd like to make myself one at some point. It really is a simple and straight forward project once you get the pattern right.


Thursday, January 5, 2012

Family PJs

For my Brother, his Wife, and their ADORABLE baby, I decided to make them a set of semi-matching PJs.  I didn't want to go full out matching so I opted for same bottoms, different tops.   I used Simplicity pattern 3577 (which I don't recommend) for the adult bottoms and Simplicity 2388 for the baby's outfit.  The Adult's pattern is way off size.  The clothes are way too big.  I even try to adjust for it, and they still don't come out right.  I don't know about the baby pattern yet.  I haven't heard news of the fit.  So, here are pics.


I also bought a white onesie to be worn underneath the wrap shirt.


This is a navy blue scoop neck shirt from Old Navy along with my Sister in Law's pants.

Navy thermal shirt (also from Old Navy) to go along with my brother's pants.

Ok, few notes.  1) this was the only flannel print that I thought my brother would wear from Joann's.   2) I wanted to and priced out making t-shirts to go along.  The fabric would have been $30 and then I would have also had to sew knits.  These shirts cost about $10 at Old Navy total.  I'm all for making stuff, but it's to save money.  I try to stay practical in my crafting endeavors.

I hope you are looking forward to more Christmas reveals!  I am also working on new stuff as I catch up on the old.  So, I won't be running off any time soon!

Wednesday, January 4, 2012

Happy New Year! (And Thanksgiving too!)

Wow! Sorry for my blatant disappearance!  I was super busy making Christmas gifts and also sad I couldn't publish most of them until after Christmas.  Fortunately, I managed to finish just 6 minutes before 12 am Christmas Morning!  So, in the upcoming days I will be posting pics of the things I made.  But for now, onto my Thanksgiving post!

Thanksgiving morning started out a little troublesome.  I was super excited to watch the Macy's Thanksgiving parade with the girls.  I had talked it up for days beforehand and Peanut was equally excited.  I was very disappointed to find they don't air it on NBC here because they air the local Detroit Parade.  The CBS coverage was lacking (to put it nicely).

Our friends came and the cooking went pretty well.  Until the end.  Our one recipe for stuffing calls for a broasting pan that gets started on the stove and then put into the oven.  Our friend brings over this pan for us as this is the only thing we use it for all year.    He also happens to be a big helper in the kitchen.  So, when the timer went off I grabbed a hot pad and put the pan on the stove.  He was in between the bowl and I, so I walked around him, grabbed the bowl, and went back.  That's when the huge mistake happened.  I grabbed the long handle of the pan with my bare hand.  It burned my hand pretty badly and I'm fairly certain I cursed.  I ran over to the sink and ran water on it.  I held ice in my hand the rest of the night and took a bunch of pain killers to help.  It seared my hand right in the bend and at the base of my thumb.  It made it super hard to use it.  I ended up having to put aloe on it, cover it with a gauze strip, and then wrap it to hold the gauze on.  I felt like a cripple for days.  Took 4 days to get better.  Oh, did I mention Papa B left early Black Friday and was gone for a week?  It was really hard to pick Munchkin up and generally care for them one handed.  Took until right before Christmas for it to blister and there's still some scarring.  Ok, enough about the hand injury, back to the food...and the table!!

As far as the food is concerned, we did all the same stuff we did last year.  We had mashed potatoes, corn, green bean casserole, sweet potatoes, rolls, 2 kinds of cranberry sauce, cornbread stuffing, traditional stuffing, and of course, the turkey!

All my months of planning and shopping paid off!  I loved how all the plates and the runner looked with all the food and gold table cloth.   Sorry the picture isn't great, I was taking it one handed while everyone was standing around impatiently.  Happy (belated) Thanksgiving!