Wednesday, August 31, 2011

Plaid Baby Doll Dress


I love buying things on clearance.  I'm a sucker for a good deal.  So, right now is the big end of season clearance at Target.  They're getting rid of all their summer clothes and making room for the fall stuff.  I found this top in the misses department.  It was originally 17.99 and now on clearance for 4.49.  I thought it was a really cute top, but there was no way I was going to wear it.  I never wear sleeveless tops and I feel like this is for an 18 year old, not a 28 year old (yes, I hesitated when I typed my age).  But, it looked like a really cute toddler dress.  By the way, this is a size large, in case you are interested in going to find one of your own.

So,  I got it home and tried it on Peanut.  It was a bit big around the chest and so I pinned it to the point where it wouldn't fall right off but not very tight.  I ended up getting rid of about 4 inches total.  I just sewed right down the side with about a 2 inch seam (front + back = 4").   Then I made 2 straps each 1" wide (cut 2 - 2 1/2" x 13" strips, fold in half with 1/2" seam, turned right side out and ironed).


I tried the dress on Peanut again and marked where I thought the straps should go.  I attached the straps and adjusted them so they were tight enough.  I sewed 2 seams on each end of the straps for durability. I used the existing seams for the shirring and sewed on top of them so as to hide them.


Peanut loves her new dress.  She fought Papa B tonight taking it off to put her PJ's on.  She said she wants to wear it all the time because its so pretty.  It's pretty long on her and still a little loose around the chest.  I left the straps long so that if it still fits next year I can adjust the straps as needed.  1 hr and $4.49 later Peanut has a dress she might be wearing for the next year!


Friday, August 26, 2011

Birthday Goodies!

A birthday only comes once a year.  So, might as well get the most you can out of it!  Around here there are a ton of birthday freebies and discounts so I spent my day collecting them!  To start, last week, I got my free burrito and drink at Moe's Southwest Grill.  You have to sign up for their emails ahead of time and then they email you the coupon and it's good for a few weeks.


This morning my first stop was Zingerman's Bakery and then Zingerman's Coffeehouse as well.  I got 6 (Yes 6!!!) free bagels and a free small coffee. No advanced planning needed for this one.


Next I went to World Market with my $10 off coupon (sign up for email beforehand).  I got this lovely gravy boat and butter dish for $1!  The dish was $6 and the gravy boat $5, minus my coupon left me with $1 plus tax.  I'm so excited to finally have a gravy boat!  I feel like such a grown up now.


Oh, before lunch we went to the Salvation Army.  Our Salvation Army (and maybe others?) gives 25% off on your birthday.  In addition to these dishes (for Thanksgiving) I got a jean coat and pair of jean overalls for Peanut and a new sweater for me with the tags still on.  I ended up spending $15 total.

We then went to lunch at BD's Mongolian Grill with Papa B.  I signed up for their email last night and got a free meal coupon in my email this morning!  Sorry, I don't have a picture of my lunch.  


After lunch I went to The Cupcake Station for my free mini cupcake and to get cupcakes for our dessert tonight.  On the left is a Samoa Cupcake (mine).  The middle one is the party cupcake (Peanut's). Lastly, the far right is the bumpy cake cupcake (Papa B's).  Bumpy Cake is a michigan thing. It's a cake (or cupcake) with whipped cream on top and then covered in chocolate than then hardens.  It's amazing but I'm not a huge fan of chocolate cake.  Oh, my mini cupcake was German Chocolate.  It didn't make it home to get it's picture taken. (very delicious, btw!)


Finally, before we headed back home for nap time, I made my very first trip to Ann Arbor Sewing and Quilting Center.   They give 30% all cuts of fabric over 1/2 yard on your birthday.  I have a specific plan for these fabrics, but you'll have to wait to see it!  All I'll say is that I'm very excited!

So, we were running around for 5 hours today.  And, I did spend some money.  But, I had a lot of fun and I'm super excited about all the birthday deals I got!


Thursday, August 25, 2011

Fresh Lima Beans!

I have never had fresh lima beans before.  My lima bean plants are going crazy and today they took out my trellis put there for the cucumbers.  I have been so excited to get some beans that I've been going out there daily just to check.  Finally they're ready!


Here are my freshly picked beans!  I don't mind that I only got a few to start.  It's just the beginning!


Here are the beans out of the pods.  It was pretty easy to open them and get the beans out.  The only way I've ever had limas (and they've always been frozen) is in succotash.  So, that's what I made!


It's amazing how much more flavor fresh limas have!  I liked succotash before, but it's so much better with fresh limas!  I have already bought fresh corn for next time so I can make the entire succotash fresh instead of using frozen corn.

Tuesday, August 23, 2011

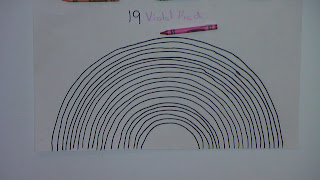
Rainbow Countdown Calendar


Ever since Peanut found out she was going to school she's been asking us daily if she can go to school.  I decided the best way to stop the asking was to make a countdown calendar for her so she could see how much longer it was until school started.  I spent a couple days mulling over ideas until I came up with the rainbow.  This way Peanut is learning about the rainbow and different colors while counting down the days until the start of school.

It ended up being a very cheap project.  $.39 for the poster board (which, I didn't use the whole piece) and $.40 for the box of Crayola crayons which will be just fine once we're done.  I love the back to school sales.  I buy a few boxes of crayons each fall to get us through the year.


For the Rainbow I used my protractor and did it in 1/2" increments.  I then retraced my lines with a sharpie.  As you can tell, I don't draw very straight (curved?) lines.


I used a sharpie to right the numbers and then wrote the color of the crayon using the crayon.  I'm such a genius.  Then I taped the crayon below the word.  In hindsight, I wish I had put 19 right under 18.  So, if you make one, I suggest you do that.  I think it would be prettier.


Peanut was quite excited to start coloring her rainbow.  She's already asked a few more times today if she could color another one.  At least she's bugging me about something other than when school starts.


Sunday, August 21, 2011

Wagon Messenger bag

We got a fantastic new wagon for the girls.  It's the Radio Flyer Deluxe Red Wagon.  It's almost exactly the same as Ultimate Family Wagon, but it has smaller wheels and is sold only at Walmart.  I really don't like shopping at Walmart, but they had it in stock and it was a little bit cheaper than ordering the Ultimate online.  It has 2 seats that move into 5 different positions, and a removable canopy.  I joked with my friend the other day that it has more cup holders than her car.  Anyway, the wagon is awesome and it seems to be working really well for us, but it was lacking in cargo room.  It does have a storage area, which works great, but it's not enough.  We found the storage area works best as a cooler.  We stick our lunches and/or snacks in it with some ice and it manages to stay cool really well.

 Anyway, there's this great little grove on the end of the wagon opposite the handle that looked perfect for wrapping a strap around.  Now, Radio flyer does make a bag to fit on this end, but its a cool (or not so cool) $40.  I certainly don't have $40 to buy a bag for my $100 wagon.  Just not in the budget when we've got leaky faucets and a fussy light in the kitchen.  So, I decided to make my own.  I pictured a messenger bag with a nylon strap to hang on that end part.  So, after some running around at Joann's, some sketching, and a lot of mental sewing this is what I came up with:


I also found a great temporary home for my flower!

So, it's not a perfect fit.  The bag isn't very deep.  But, it held all the essential diaper bag stuff and the dry snacks perfectly.  This is definitely awesome as a first try and next I'm going to see about making an insulated one to act as a cooler.   I'm really happy with it and I think I just found a great way to let Peanut decorate the front.  Here's a side shot:


It's only about 3 1/2" deep.


Here you can see the strap that attaches it to the wagon.  I made the strap really long and adjustable so that we can lengthen it and use it as a shoulder bag.  That came in really handy today when we went out to eat on our way home.  I was just able to loosen the strap and take the bag in with us.  So, the project cost about $5 and 3 hours time.  Definitely better than $40 and waiting for it to come in the mail.  I can tell I'm getting tired.  I just typed in "male" twice before spelling it right.  Good night!


Tuesday, August 16, 2011

Bear Chair, a Makeover/execution


I got this horrid bear chair at a yard sale for $1.  The lady who was selling it was elated.  She said it was her daughter's when she was little and now her daughter is in her 30's.  This makes this chair older than me.  She asked if I was going to redo it and I told her I was.  She was so excited that I didn't have the heart to tell her the bear would be no more.  I took great joy (probably a little too much) in cutting the bear's head off.  Power tools are always a good time.


I foolishly thought that I could get it done in one day as part of my a project a day series.  It ended up taking me 3 days.  On day 1 I ripped all the old stuff off and painted the wood.  Day 2 I cut the bears head off.  I also attached the new foam and started putting on the fabric.  I then realized that the wood where the backs of the arms attach was destroyed and so I had to reattach the arms in a new way.  I decided I needed L brackets but didn't have any in the garage, so I had to wait.  Day 3 (today) I bought some L brackets while out on my errands and finished the fabric after screwing the arms back on.  On a side note I was next to Joann Fabrics today and didn't go in!
I'm really happy with how the chair turned out, but I'm not looking forward to the next one.  I have this great rocker that my aunt gave me and I'd like to do it to match, but I think I'm more nervous after having done this one.


I felt like I had to share the chair!


Monday, August 15, 2011

Cork Board

So, today I redid a cork board I got for free at a yard sale.  I didn't take a picture before I painted the frame. It was the basic wood color most cork boards come in.  So, first I painted the frame using White Lightening mixed with white acrylic paint. 


Then, I taped it up before spraying the cork with adhesive spray.


Then I laid down my fabric and smoothed it out flat.


I took off the tape and hot clued ribbon around the edge to cover up the edge of the fabric.


Hung it up on the wall, attached a few things and I was done!


I really needed this to keep important things in plain site.  The piece of paper on the right is my crafting "to do" list.  The coupon on the left is for Tractor Supply.  We might be using it to buy a chainsaw this week to cut up the tree branches that fell during a storm.  Never a dull moment!


Friday, August 12, 2011

Blogger Love

Well, I was trying to post about the project of the day, redoing a cork board, but blogger isn't being nice and my pictures won't load.  So, I'll try again tomorrow.  I just wanted to make sure you didn't think I forgot about you all!

Thursday, August 11, 2011

More Felt Dahlia Flowers


My crafty to-do list has gotten crazy long.  So, I've resolved to do 1 project a day for the next 7 days.  Today's project was to make more felt Dahlia flowers.  I made one for myself, one for each of my grandmother's upcoming birthdays, and one for my new niece.  They're pretty easy to make, but time consuming.  Also, very dangerous.  I burned the back of my finger really well and got a big blister.  Tomorrow's project is to finally redo the cork board I got for free at a yard sale back in May.

Tuesday, August 9, 2011

Citrus Tequila Chicken Thighs & Tex-Mex Black Bean Salsa


Tonight's dinner consisted of Citrus Tequila Chicken Thighs along with some tex-mex black bean salsa. I love me some black beans!  The salsa was really good, but doesn't keep very well.  So, I would suggest only making it if you plan on eating it all.

The chicken was really good.  I'm one of those people who loves tequila and wonders why no one else does.  It had a hit of the tequila flavor, but obviously not the alcoholic content.  We really didn't care for the rice salad part, so I didn't include that part of the recipe.  Leave a comment if you are interested in it.


Citrus Tequila Chicken Thighs

Ingredients:
1/2 cup orange juice
1/4 cup lime juice
1/4 cup tequila
2 tbsp canola oil
1 tsp salt
1/2 tsp pepper
6 large skinless bone-in chicken thighs

Directions:
Place orange juice, lime juice, tequila, canola oil, salt and pepper in a large resealable plastic bag.  Add chicken and seal.  Marinage in refrigerator 4 hours or overnight.
Heat grill to a medium-high and set up one side for indirect grilling.  Lightly coat grill rack with oil or nonstick cooking spray.
Remove chicken from plastic bag and pour marinade into a small saucepan.  Boil for 1 minute and reserve.  Place chicken on direct heat and grill for 5 minutes per side.  Remove to indirect heat and grill for 20 minutes or until internal temp reaches 160.  Baste every 5 minutes with the reserved marinade.

Tex-Mex Black Bean Salsa


Ingredients:
2 medium size roma tomatoes
1/2 medium-size red onion
3 scallions
1 15 oz can black beans, drained and rinsed
1 1/2 tbsp taco seasoning mix
2 tbsp sour cream

Directions:
Using a small knife, half each tomato.  Cut away the stem area, then cut the two halves in half.  Over the sink or a small bowl, squeeze the tomato pieces as you would a sponge to force out the seeds and water. use a knife or hand-powered food chopper to dice the tomatoes.  Put them in a large bowl.
Dice the red onion and add them into the bowl.  Finely chop the scallions and add them to the bowl along with the beans.
Sprinkle on the taco seasoning and lightly toss the mixture until evenly blended.  Spoon in the sour cream and toss again until the ingredients are fully coated.  Makes 3 cups.

Chicken recipe from Family Circle (7/10) and Tex Mex Black Bean Salsa from FamilyFun (8/10)

Sunday, August 7, 2011

Beef n' Been Burgers


Tonight I made beef n' bean burgers for dinner.  I'm not a big fan of vegetarian burgers, but I like the idea of adding beans.  This was the perfect compromise.  Also, the addition of the beans and rice made them go farther so it saves money as well. The cumin and chili powder gave it a ton of flavor, but wasn't spicy.  It was also great to give to Munchkin.  It had meat, black beans, and rice in it.  I just added some veggies on the side for her and she gobbled it.

Beef n' Bean Burgers

Ingredients:
1 pound lean ground beef
1 15 oz can black beans, rinsed
1/2 leftover white or brown rice, cold
1 tbsp grill seasoning (I use McCormick Montreal Steak seasoning)
1 tbsp chili powder
1 1/2 tsp ground cumin
1 1/2 tsp ground coriander
1 tbsp vegetable oil

Directions:
In a large bowl, combine the beef, beans, rice,grill seasoning, chili powder, cumin and coriander.  Form into 4 patties.
In a large skillet, heat the oil over medium-high heat.  Add the patties and cook, turning once and lowering the heat slightly for the last few minutes, until browned, 12 minutes.

Recipe from Rachel Ray Magazine

Tuesday, August 2, 2011

Garden Stakes: A Tutorial


Here is the tutorial on how to make the garden stakes!  It's not a hard thing to do, but it does take some time because of the drying in between layers of paints.

What You'll need:
Wood Slats (7 9/64" x 2 13/16" x 3/16")
Dowels (1/4" x 12")
Pieces of scrapbooking paper (min size 6 1/2" x 2 1/4")
Paper letters (1" high)
Acrylic paint
Modge Podge
Hot glue gun
Spray sealer


First, paint the signs on all sides.  2 coats is best for good coverage.  (you can see the sugar scrub jars I was making at the same time, hehe)  While the boards are drying cut your paper and your letters if you need to.  I used premade letters.  Cut your paper into rectangles measuring 6.5" x 2.25".


Once you have all your boards painted and dried, time to pull out the Modge Podge!  First, paint a layer of Modge Podge on the front of your board.


Next, paint the back of your paper with Modge Podge and place it centered on your board.  Cover with another coat of Modge Podge.


Place your letters on the paper and coat with yet another layer of Modge Podge.  Let dry and enjoy peeling the dried Modge Podge off your fingers! This is one of my favorite parts.  Brings back memories of first grade when my best friend and I would coat our hands in glue and then peel them when dry.


Either during the rest of the painting or while you are waiting for the modge podge, paint your dowels.  I also recommend two coats of paint.  I painted the majority of them with 2 coats, and then once they were dry painted the bottom two inches.


Here are all the finished signs.  As you can see two of them are different.  My stepmom's cabbage was eaten early on by critters and she's growing peanuts.  

Unfortunately, this is where I run out of pictures, and I apologize.   After everything is dry, put a double line of hot glue up the middle back of the signs.  push the dowels into the glue.  

Then, outside (please) spray the signs with the spray sealer.  I did 3 coats on each the front and the back trying to catch the sides as well.


Stick them into your garden and Voila!

I bet you could use this method for signs for holidays and stuff too.   Even a cute little garden quote.  I might have to try that!

Photobucket


Monday, August 1, 2011

Ollie's Bargain Outlet


Ollie's is something very special to Central Pennsylvania. (Update: I just read that they now have 104 stores in 12 states. Crazy!) They are an outlet store that gets things with mistakes, leftovers, and extras.  They have some great deals and, to me, it's a crafter's paradise.


Ollie was a real person.  He died in the '80s.  He was an icon of the Harrisburg area.  His face covers the store and all advertisements.


One of the great things is the sheet selection.  They have sets, but they also have single sheets and pillowcases ranging from $.99 to $2.99 apiece.  Sheets are a great way to get a large amount of cotton the cheap.  Getting nice new, clean ones on the cheap is even better!


They've got a selection of school supplies.  I can't believe it's almost time for school already!


Another view of the store


These are the type of cheesy slogans they use.  This sign and a ton others don the walls of the stores.


The loot!  I got 2 plastic placemats that I'm hoping to be able to use with washable markers.  1 cloth one (the green stripe in the back) that I want to use as grass under toys or cars.  1 green plastic table cloth to make into a car playmat for the matchbox cars.  The purple is a package of paper placemats.  I felt like for $1 they would be great to color on or use for crafts. The 3 cans are spray paint that will turn stuff into frosted glass.  As you can see I got blue, green, and purple.  I thought they were such pretty jewel colors that I wanted to try them out.  Each item was $1.  So, I ended up spending $8.  I can't wait to see what I end up using these things for and I can't wait until I visit PA again so I can go back to Ollies!